파워포인트 VBA 매크로 예제 및 튜토리얼
In this Article
- VBA PDF (무료 다운로드)
- 파워포인트 VBA (매크로) 튜토리얼
- Save As Macro-Enabled Presentation
- 리본에서 ‘개발자’ 탭 활성화하기
- 파워포인트 매크로 만들기
- PowerPoint Application
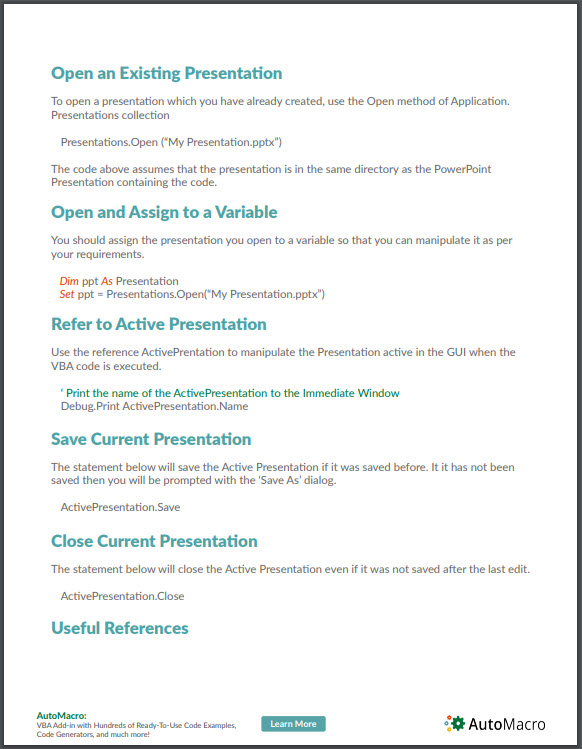
- 새 프레젠테이션 열기
- 기존 프레젠테이션 열기
- 파일을 열고 변수에 할당하기
- 활성 프레젠테이션 참조하기
- 현재 프레젠테이션 저장
- 현재 프레젠테이션 닫기
- 유용한 참조
- 기존 프레젠테이션(이름 기준)을 변수에 할당하기
- 활성 슬라이드를 변수에 할당하기
- 슬라이드(인덱스)를 변수에 할당하기
- 슬라이드 수 계산하기
- 현재 슬라이드의 인덱스 번호 가지고 오기
- 마지막 슬라이드 뒤에 빈 슬라이드 추가하기
- 현재 슬라이드 뒤에 슬라이드 추가하기
- 슬라이드 삭제하기
- 특정 슬라이드로 이동하기
- 슬라이드 이동하기
- 모든 슬라이드 반복하기
- 활성 슬라이드의 모든 도형을 반복하기
- 모든 슬라이드의 모든 도형 반복하기
- 활성 슬라이드의 모든 텍스트 상자 반복하기
- 모든 슬라이드의 모든 텍스트 상자 반복하기
- 선택한 슬라이드를 새 PPT 프레젠테이션으로 복사하기
- 활성 슬라이드를 활성 프레젠테이션의 끝으로 복사
- 유용한 파워포인트 매크로 예제
- Excel에서 PowerPoint 자동화하기
이 문서는 VBA(Visual Basic for Applications) 매크로를 사용하여 PowerPoint를 자동화하는 방법에 대한 가이드입니다. 아래에서 유용한 예제를 찾아보실 수 있습니다.
VBA PDF (무료 다운로드)
무료 Microsoft PowerPoint VBA 튜토리얼을 다운로드하세요! 또는 다른 오피스 프로그램을 위한 VBA 튜토리얼입니다!
파워포인트 VBA (매크로) 튜토리얼
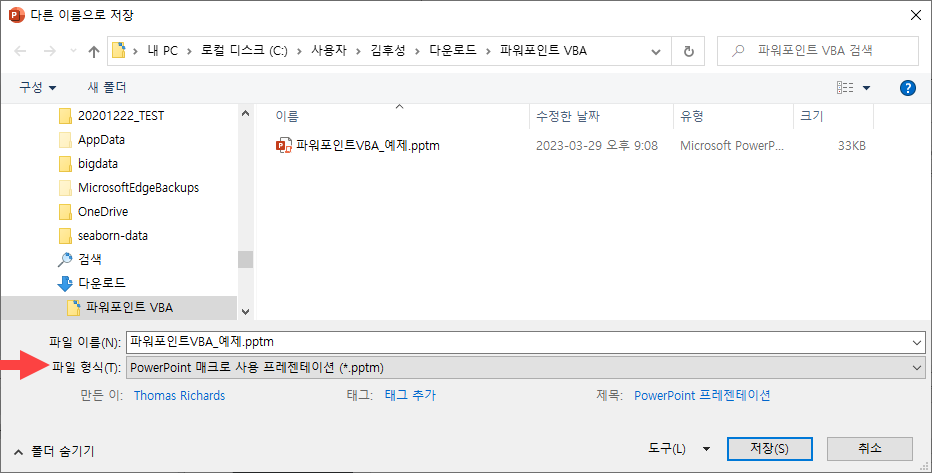
Save As Macro-Enabled Presentation
VBA 코드가 포함된 프레젠테이션은 ‘다른 이름으로 저장’시 파일 형식을 ‘PowerPoint 매크로 사용 프레젠테이션(*.pptm)’으로 설정해야 합니다.
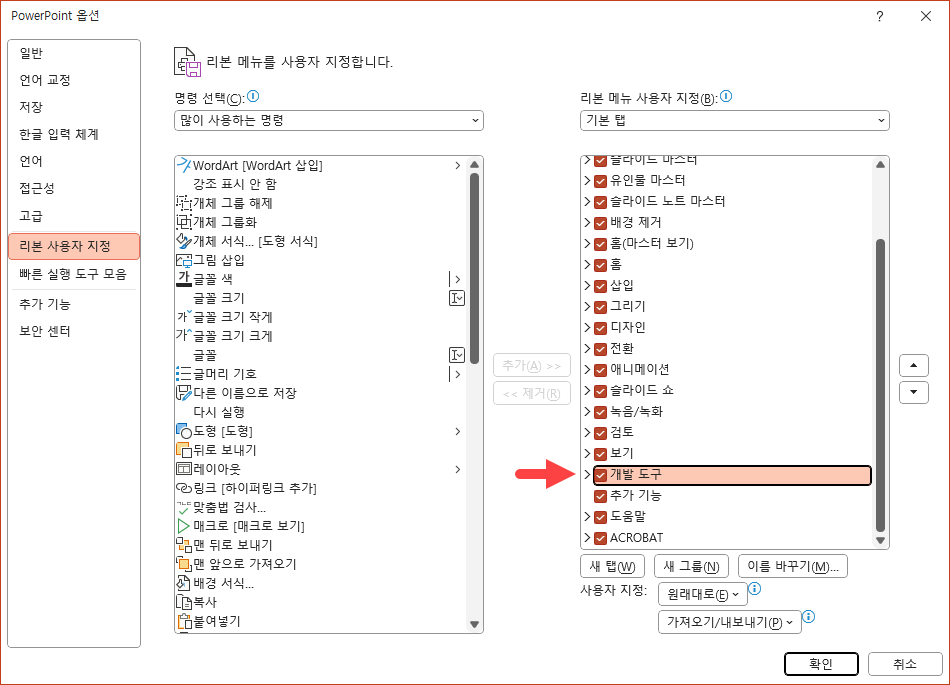
리본에서 ‘개발자’ 탭 활성화하기
VBA 코드를 생성하기 전에 리본에서 개발도구 탭을 활성화해야 합니다. 이렇게 하려면 파일 -> 옵션을 선택한 다음 ‘리본 사용자 지정’을 클릭하고 오른쪽 창에서 ‘개발도구’ 탭 옆의 체크박스를 선택합니다.
파워포인트 매크로 만들기
다음은 파워포인트 VBA 매크로의 간단한 예시입니다:
Sub SavePresentationAsPDF()
    Dim pptName As String
    Dim PDFName As String

    ' 파워포인트를 PDF로 저장
    pptName = ActivePresentation.FullName
    ' 파일 이름에서 PowerPoint 확장자를 PDF로 바꾸기
    PDFName = Left(pptName, InStr(pptName, ".")) & "pdf"
    ActivePresentation.ExportAsFixedFormat PDFName, 2  ' ppFixedFormatTypePDF = 2

End Sub
활성 프레젠테이션을 PDF로 저장합니다. 각 코드는 다음을 수행합니다:
- PowerPoint 이름과 PDF 이름에 대한 변수를 만듭니다.
- 활성 프레젠테이션 이름을 pptName 변수에 할당합니다.
- 전체 PDF 이름을 만듭니다.
- 프레젠테이션을 PDF로 저장합니다.
PowerPoint Application
파워포인트 프레젠테이션 내에서 VBA 코드가 실행 중인 경우, 파워포인트 애플리케이션이 기본 애플리케이션이 되며 명시적으로 참조하지 않고도 조작할 수 있습니다. 새 프레젠테이션을 만들어 보겠습니다.
프레젠테이션을 만들려면 PowerPoint 애플리케이션의 Add 메서드를 사용합니다.
Application.Presentations.Add
' Application은 생략이 가능합니다.
Presentations.Add
새 프레젠테이션 열기
새로운 비어있는 프레젠테이션을 열려면 Application.Presentations 컬렉션의 Add 메서드를 사용합니다.
Presentations.Add기존 프레젠테이션 열기
이미 만든 프레젠테이션을 열려면 Application.Presentations 컬렉션의 Open 메서드를 사용합니다.
Presentations.Open ("My Presentation.pptx")위의 코드는 ‘My Presentation.pptx’ 파일이 코드가 포함된 PowerPoint 프레젠테이션과 같은 디렉터리에 있다고 가정합니다.
파일을 열고 변수에 할당하기
필요에 따라 조작할 수 있도록 열린 프레젠테이션을 변수에 할당해야 합니다.
Dim ppt As Presentation
Set ppt = Presentations.Open("My Presentation.pptx")
활성 프레젠테이션 참조하기
VBA 코드가 실행될 때 GUI에서 활성화된 프레젠테이션을 조작하려면 ActivePresentation 참조를 사용합니다.
' 활성 프레젠테이션의 이름을 직접실행창에 프린트합니다.
Debug.Print ActivePresentation.Name
현재 프레젠테이션 저장
아래 구문은 이전에 저장된 경우 활성 프레젠테이션을 저장합니다. 저장되지 않은 경우 ‘다른 이름으로 저장’ 대화 상자가 표시됩니다.
ActivePresentation.Save현재 프레젠테이션 닫기
아래 구문은 마지막 편집 후 저장하지 않은 경우에도 활성 프레젠테이션을 닫습니다.
ActivePresentation.Close유용한 참조
기존 프레젠테이션(이름 기준)을 변수에 할당하기
Dim myPresentationByName As Presentation
Set myPresentationByName = Application.Presentations("My Presentation")
활성 슬라이드를 변수에 할당하기
Dim currentSlide As Slide
Set currentSlide = Application.ActiveWindow.View.Slide
슬라이드(인덱스)를 변수에 할당하기
Dim mySlide As Slide
Set mySlide = ActivePresentation.Slides(11)
슬라이드 수 계산하기
Dim slideCount As Long
slideCount = ActivePresentation.Slides.Count
현재 슬라이드의 인덱스 번호 가지고 오기
Dim currentSlideIndex As Integer
currentSlideIndex = Application.ActiveWindow.View.Slide.SlideIndex
마지막 슬라이드 뒤에 빈 슬라이드 추가하기
Dim slideCount As Long
Dim newSlide as Slide

slideCount = ActivePresentation.Slides.Count
Set newSlide = ActivePresentation.Slides.Add(slideCount + 1, 12)
' 또는 ppLayoutBlank는 12와 같은 의미이기 때문에 아래와 같은 구문으로도 사용 가능합니다.
Set newSlide = ActivePresentation.Slides.Add(slideCount + 1, ppLayoutBlank)
현재 슬라이드 뒤에 슬라이드 추가하기
Dim newSlide As Slide
Dim currentSlideIndex as Integer

currentSlideIndex = Application.ActiveWindow.View.Slide.SlideIndex
Set newSlide = ActivePresentation.Slides.Add(currentSlideIndex, ppLayoutBlank)
슬라이드 삭제하기
Dim currentSlideIndex as Integer

currentSlideIndex = Application.ActiveWindow.View.Slide.SlideIndex
ActivePresentation.Slides(currentSlideIndex).Delete
특정 슬라이드로 이동하기
' 4번 슬라이드로 이동합니다
Application.ActiveWindow.View.GotoSlide (4)
슬라이드 이동하기
슬라이드의 위치를 이전 위치에서 새로운 위치로 이동할 수 있습니다.
' 3번 슬라이드를 첫 번째 슬라이드로 이동하기
Dim oldPosition as integer, dim newPosition as integer

oldPosition = 3
newPosition = 1
ActivePresentation.Slides(oldPosition).MoveTo toPos:=newPosition
모든 슬라이드 반복하기
각 슬라이드에 대해 특정 작업을 수행하거나 모든 슬라이드를 살펴보고 몇 개의 슬라이드를 찾아서 코드를 사용하여 특정 작업을 수행할 수 있습니다;
Dim mySlide as Slide

For Each mySlide In ActivePresentation.Slides
   ' 'mySlide' 변수로 참조된 현재 슬라이드에 대해 특정 작업을 수행합니다
   ' Debug.Print mySlide.Name
Next Slide
활성 슬라이드의 모든 도형을 반복하기
The power of PowerPoint can be realized by using ‘Shapes.’ The code below loops through all the shapes on the current slide so that you can manipulate them as you want;
Dim currentSlide as Slide
Dim shp as Shape

Set currentSlide = Application.ActiveWindow.View.Slide
For Each shp In currentSlide.Shapes
  ' 변수 'shp'로 참조된 도형에 특정 작업을 수행합니다.
  ' 예를 들어 직접실행 창에 도형의 이름을 인쇄합니다.
  Debug.Print shp.Name
Next shp
모든 슬라이드의 모든 도형 반복하기
모든 슬라이드를 반복하는 구문을 추가하여 프레젠테이션의 모든 도형을 반복할 수 있습니다.
Dim currentSlide as Slide
Dim shp as Shape

For Each currentSlide In ActivePresentation.Slides
  For Each shp In currentSlide.Shapes
    ' 변수 'shp'로 참조된 도형에 특정 작업을 수행합니다.
    Debug.Print shp.Name
  Next shp
Next currentSlide
활성 슬라이드의 모든 텍스트 상자 반복하기
텍스트 상자는 파워포인트 프레젠테이션에서 가장 자주 사용되는 도형 개체 중 하나입니다. ‘도형 유형’에 대해 확인하는 코드를 추가하여 모든 텍스트 상자를 반복할 수 있습니다. 텍스트 상자의 모양 유형은 VBA 상수 msoTextBox로 정의됩니다(상수의 숫자 값은 17입니다).
Dim currentSlide as Slide
Dim shp as Shape

Set currentSlide = Application.ActiveWindow.View.Slide
For Each shp In currentSlide.Shapes
  ' 도형 유형이 msoTextBox인지 확인합니다.
  If shp.Type = 17 Then ' msoTextBox = 17
    '텍스트 상자에 있는 텍스트를출력합니다.
    Debug.Print shp.TextFrame2.TextRange.Text
  End If
Next shp
모든 슬라이드의 모든 텍스트 상자 반복하기
다시 말하지만, 모든 슬라이드를 반복하는 구문을 추가하여 프레젠테이션의 모든 텍스트 상자를 반복할 수 있습니다.
Dim currentSlide as Slide Dim shp as Shape

For Each currentSlide In ActivePresentation.Slides
  For Each shp In currentSlide.Shapes
    ' 도형 유형이 msoTextBox인지 확인합니다.
    If shp.Type = 17 Then ' msoTextBox = 17
      ' 변수 'shp'로 참조된 도형에 특정 작업을 수행합니다.
      Debug.Print shp.TextFrame2.TextRange.Text
    End If
  Next shp
Next currentSlide
선택한 슬라이드를 새 PPT 프레젠테이션으로 복사하기
특정 슬라이드를 새 프레젠테이션으로 복사하려면 먼저 기존 프레젠테이션에서 원하는 슬라이드를 선택한 다음 아래 코드를 실행합니다;
Dim currentPresentation as Presentation
Dim currentSlide as Slide
Dim newPresentation as Presentation

' 현재 프레젠테이션에 대한 참조를 변수로 저장합니다
Set currentPresentation = Application.ActivePresentation

' 현재 슬라이드에 대한 참조를 변수로 저장합니다
Set currentSlide = Application.ActiveWindow.View.Slide

' 새로운 프레젠테이션을 추가하고 참조를 변수로 저장합니다
Set NewPresentation = Application.Presentations.Add

' 선택한 슬라이드를 복사합니다
Selection.Copy

' 새로운 프레젠테이션에 붙여넣습니다
NewPresentation.Slides.Paste
활성 슬라이드를 활성 프레젠테이션의 끝으로 복사
' 현재 슬라이드를 복사합니다
Application.ActiveWindow.View.Slide.Copy

' 프레젠테이션의 끝에 붙여넣습니다
ActivePresentation.Slides.Paste
유용한 파워포인트 매크로 예제
다음은 작업을 수행하는 방법을 보여주는 몇 가지 유용한 매크로 예제입니다. 또한 위에서 설명했던 내용을 예제로 보여드립니다.
슬라이드 쇼 중 슬라이드 변경하기
Sub ChangeSlideDuringSlideShow()
    Dim SlideIndex As Integer
    Dim SlideIndexPrevious As Integer

    '  슬라이드 쇼 도중 현재 슬라이드를 슬라이드4 로 변경합니다.
    SlideIndex = 4
    ' 현재 슬라이드 쇼 창의 인덱스는 SlideShowWindows 컬렉션에서 1입니다.
    SlideIndexPrevious = SlideShowWindows(1).View.CurrentShowPosition
    SlideShowWindows(1).View.GotoSlide SlideIndex

End Sub
모든 슬라이드의 모든 텍스트 상자 글꼴 변경하기
Sub ChangeFontOnAllSlides()
    Dim mySlide As slide
    Dim shp As Shape

    ' 모든 슬라이드의 글꼴 크기 변경하기
    For Each mySlide In ActivePresentation.Slides
      For Each shp In mySlide.Shapes
        If shp.Type = 17 Then ' msoTextBox = 17
          ' 글꼴 크기를 24로 변경
          shp.TextFrame.TextRange.Font.Size = 24
        End If
      Next shp
    Next mySlide

End Sub
모든 텍스트 상자에서 글꼴 옵션의 ‘모두 대문자로’를 해제하기
Sub ChangeCaseFromUppertoNormal()
    Dim mySlide As slide
    Dim shp As Shape

    ' 모두 대문자로 옵션 해제하기
    For Each mySlide In ActivePresentation.Slides
      For Each shp In mySlide.Shapes
        If shp.Type = 17 Then ' msoTextBox = 17
          ' 모두 대문자로 옵션 해제하기
          shp.TextFrame2.TextRange.Font.Allcaps = False
        End If
      Next shp
    Next mySlide

End Sub
‘모두 대문자로 옵션’을 토글하기(체크-> 해제 / 해제->체크)
Sub ToggleCaseBetweenUpperAndNormal()
    Dim mySlide As slide
    Dim shp As Shape

    '  모든 슬라이드의 모두 대문자로 옵션 토글하기
    For Each mySlide In ActivePresentation.Slides
      For Each shp In mySlide.Shapes
        If shp.Type = 17 Then ' msoTextBox = 17
          ' 체크/해제를 토글하기
          shp.TextFrame2.TextRange.Font.Allcaps = _
            Not shp.TextFrame2.TextRange.Font.Allcaps
        End If
      Next shp
    Next mySlide

End Sub
Descender 문자에 대해 밑줄 제거하기Remove Underline from Descenders
타이포그라피에서 Descender는 글꼴의 기준선 아래로 확장되는 글자 부분입니다. 대부분의 글꼴에서 내림꼴은 g, j, q, p, y와 같은 소문자로 구서오디어 있습니다(때때로 f도 포함됩니다).
Descender에 해당하는 문자에 밑줄을 그을 경우 보기 좋지 않습니다. 다음은 전체 프레젠테이션에서 g, j, p, q 및 y와 같은 모든 문자에서 밑줄을 제거하는 코드입니다.
Sub RemoveUnderlineFromDescenders()
    Dim mySlide As slide
    Dim shp As Shape
    Dim descenders_list As String
    Dim phrase As String
    Dim x As Long

    ' Descenders에 해당하는 문자에서 밑줄을 제거합니다
    descenders_list = "gjpqy"
    For Each mySlide In ActivePresentation.Slides
      For Each shp In mySlide.Shapes
        If shp.Type = 17 Then ' msoTextBox = 17
         ' g,j,p,q,y의 문자에서 밑줄을 제거합니다.
         With shp.TextFrame.TextRange
            phrase = .Text
           For x = 1 To Len(.Text)
             If InStr(descenders_list, Mid$(phrase, x, 1)) > 0 Then
              .Characters(x, 1).Font.Underline = False
             End If
           Next x
         End With
       End If
      Next shp
    Next mySlide

End Sub
모든 슬라이드에서 애니메이션 제거하기
아래 코드를 사용하여 프레젠테이션에 설정된 모든 애니메이션을 제거합니다.
Sub RemoveAnimationsFromAllSlides()
    Dim mySlide As slide
    Dim i As Long

    For Each mySlide In ActivePresentation.Slides
      For i = mySlide.TimeLine.MainSequence.Count To 1 Step -1
       '각각의 애니메이션을 제거합니다
       mySlide.TimeLine.MainSequence.Item(i).Delete
      Next i
    Next mySlide

End Sub
프레젠테이션을 PDF로 저장하기
활성 프레젠테이션을 PDF 형식으로 쉽게 저장할 수 있습니다.
Sub SavePresentationAsPDF()
    Dim pptName As String
    Dim PDFName As String

    ' 파워포인트를 PDF로 저장합니다
    pptName = ActivePresentation.FullName
    ' 파워포인트의 확장자를 PDF로 변경합니다
    PDFName = Left(pptName, InStr(pptName, ".")) & "pdf"
    ActivePresentation.ExportAsFixedFormat PDFName, 2  ' ppFixedFormatTypePDF = 2

End Sub
텍스트 찾기 및 바꾸기
모든 슬라이드의 모든 텍스트 상자에서 텍스트를 찾아서 바꿀 수 있습니다. 찾으려는 텍스트의 첫 번째 검색 결과(findWhat으로 정의됨) 뒤에 추가 검색 결과 있는 경우 Find 명령을 반복해야 합니다.
Sub FindAndReplaceText()
    Dim mySlide As slide
    Dim shp As Shape
    Dim findWhat As String
    Dim replaceWith As String
    Dim ShpTxt As TextRange
    Dim TmpTxt As TextRange

    findWhat = "jackal"
    replaceWith = "fox"

    ' 찾기 및 찾아서 바꾸기
    For Each mySlide In ActivePresentation.Slides
      For Each shp In mySlide.Shapes
        If shp.Type = 17 Then ' msoTextBox = 17
          Set ShpTxt = shp.TextFrame.TextRange
          '첫 번째 검색 결과 찾기
          Set TmpTxt = ShpTxt.Replace(findWhat, _
             Replacewhat:=replaceWith, _
             WholeWords:=True)

          '추가 검색 결과 찾기(존재할 경우)
          Do While Not TmpTxt Is Nothing
            Set ShpTxt = ShpTxt.Characters(TmpTxt.Start + TmpTxt.Length, ShpTxt.Length)
            Set TmpTxt = ShpTxt.Replace(findWhat, _
              Replacewhat:=replaceWith, _
              WholeWords:=True)
          Loop
        End If
      Next shp
    Next mySlide

End Sub
슬라이드를 이미지로 내보내기
현재 슬라이드(또는 다른 슬라이드)를 PNG, JPG(JPEG) 또는 BMP 이미지로 내보낼 수 있습니다.
Sub ExportSlideAsImage()
    Dim imageType As String
    Dim pptName As String
    Dim imageName As String
    Dim mySlide As slide

    ' 현재 슬라이드를 이미지 파일로 내보냅니다.
    imageType = "png" ' or jpg or bmp
    pptName = ActivePresentation.FullName
    imageName = Left(pptName, InStr(pptName, ".")) & imageType
    Set mySlide = Application.ActiveWindow.View.slide
    mySlide.Export imageName, imageType

End Sub
전체 슬라이드를 덮도록 이미지 크기 조정하기
Sub ResizeImageToCoverFullSlide()
    Dim mySlide As slide
    Dim shp As Shape


    ' 전체 슬라이드 크기로 이미지 크기 조정합니다
    ' 현재 슬라이드에서 첫 번째 도형의 높이와 너비를 슬라이드 크기에 맞게 변경합니다.
    Set mySlide = Application.ActiveWindow.View.slide
    Set shp = mySlide.Shapes(1)
    ''
    '' 선택한 도형을 확장하고 싶으면 위의 두 구문을 다음 구문과 함께 반복합니다.
    '' 아무것도 선택하지 않고 실행할 경우 오류가 발생합니다.
    'Set shp = ActiveWindow.Selection.ShapeRange(1)

    With shp
        .LockAspectRatio = False
        .Height = ActivePresentation.PageSetup.SlideHeight
        .Width = ActivePresentation.PageSetup.SlideWidth
        .Left = 0
        .Top = 0
    End With

End Sub
실행 중인 모든 슬라이드 쇼 종료
여러 슬라이드 쇼가 동시에 열려 있는 경우 아래 매크로를 사용하여 모든 슬라이드 쇼를 닫을 수 있습니다.
Sub ExitAllRunningSlideShows()

    Do While SlideShowWindows.Count > 0
        SlideShowWindows(1).View.Exit
    Loop

End Sub
Excel에서 PowerPoint 자동화하기
다른 애플리케이션(예: Excel 및 Word)을 통해 PowerPoint에 연결할 수도 있습니다. 첫 번째 단계로 파워포인트 객체를 참조해야 합니다.
이를 수행하는 방법에는 early binding 과 late binding 이 있습니다.
PowerPoint 열기 – Early Binding
에서는 도구->참조 옵션을 사용하여 VBE(비주얼 베이직 에디터)에서 ‘Microsoft PowerPoint 16 객체 라이브러리'(MS Office 2019의 경우)에 대한 참조를 설정해야합니다.
' Early Binding
Dim pptApp As Application
Set pptApp = New PowerPoint.Application
PowerPoint 열기 – Late Binding
‘Late Binding’에서 application 변수는 객체로 선언되고 VBA 엔진은 런타임에 올바른 응용 프로그램에 연결합니다.
' Late Binding
Dim pptApp As Object
Set pptApp = CreateObject("PowerPoint.Application")
PowerPoint를 사용자 눈에 보이도록 실행하기
파워포인트 애플리케이션에 대한 참조를 설정한 후에는 사용자가 볼수 있도록 설정해야합니다.
pptApp.Visible = TruePowerPoint 조작하기
위에서 만든 파워포인트에 대한 참조를 추가하기만 하면 Excel에서 위에서 설명한 파워포인트 내에서 프레젠테이션을 조작하는 모든 방법을 사용할 수 있습니다.
예를들면 위에서 설명드린 다음 코드는
Presentations.Open ("My Presentation.pptx")엑셀 VBA에서 다음과 같이 사용해야합니다.
pptApp .Presentations.Open ("My Presentation.pptx")PowerPoint 종료하기
PowerPoint 애플리케이션으로 원하는 작업을 완료한 후에는 애플리케이션을 닫아야 하며 참조를 해제해야 합니다.
pptApp.Quit
Set pptApp = Nothing
Excel에서 PowerPoint로 복사
이 코드는 Excel에서 PowerPoint로 범위를 복사합니다:
참고: VBA를 사용하여 Excel의 범위를 PowerPoint로 복사하는 방법을 보여주기 위해 간단하게 작성했습니다.
Sub copyRangeToPresentation()

' Open New PowerPoint Instance
Set pptApp = CreateObject("PowerPoint.Application")

With pptApp
    ' 새로운 프레젠테이션을 만듬니다
    Set ppt = .Presentations.Add
    ' 빈 슬라이드를 추가합니다.
    Set newSlide = ppt.Slides.Add(1, 12) ' ppLayoutBlank = 12
    ' Excel의 활성 시트에서 범위를 복사합니다.
    ActiveSheet.Range("A1:E10").Copy
    ' 파워포인트에 이미지로 붙여넣기
    newSlide.Shapes.PasteSpecial DataType:=2  '2 = ppPasteEnhancedMetafile
    ' 파워포인트로 화면 전환
    .Activate
End With

End Sub
PowerPoint VBA 자주 묻는 질문
PPT에서 매크로란 무엇인가요?
매크로는 작업을 자동화하는 일련의 프로그래밍 지침을 지칭하는 일반적인 용어입니다. 파워포인트(PPT) 매크로는 VBA 프로그래밍 언어를 사용하여 파워포인트에서 작업을 자동화합니다.
PowerPoint에서 VBA를 사용하려면 어떻게 하나요?
PowerPoint에서 VBA를 사용하려면 VBA 편집기(ALT + F11 또는 개발도구 > Visual Basic)를 열면 됩니다.
PowerPoint에서 매크로를 만들려면 어떻게 하나요?
1. VBA 편집기를 엽니다(ALT + F11 또는 개발자 > Visual Basic).
2. VBA 편집기에서 삽입>모듈 을 선택하여 코드 모듈을 생성합니다.
3. ‘Sub HelloWorld’ 를 입력하고 엔터를 누르세요.
4. ‘Sub HelloWorld’ 과 ‘End Sub’ 사이에 ‘MsgBox “Hello World!’를 입력하세요
5. 매크로 만들기에 성공하셨습니다.
6. F5를 눌러 매크로를 실행해 보세요.
작성자 : Vinamra Chandra


