VBAクラスモジュールのチュートリアルとサンプル
In this Article
このチュートリアルでは、VBAのクラスモジュールについて学習します。このチュートリアルでは、クラスモジュールとは何か、そしてどのように使用するのかを学びます。
VBA クラスモジュール – はじめに
Visual Basic Editor (VBE)にモジュールを挿入してコードを入力するとき、「クラス モジュール」と呼ばれるものを挿入できることにお気づきかもしれません。
クラスモジュールと標準モジュールの比較
クラスモジュールは、通常のモジュールとは全く異なり、コンポーネントオブジェクトモデル(COM)を作成し、通常のVBAコード内で使用することができます。
クラスモジュールでは、Excel に組み込まれているWorksheetsなどのオブジェクトと同じように動作するオブジェクトを作成することができます。 Worksheetsオブジェクトには、ワークブック内のワークシート数、ワークシートの個別名、その他多数の情報を取得するためのプロパティとメソッドが用意されています。
このように新しい Object を作成すると、VBA 内のあらゆる場所で使用できるビルディングブロックを作成することになります。このオブジェクトには多くのプロパティとメソッドがあり、ワークブック内のどこからでもVBAコードでアクセスでき、何度もコードを書き直す必要がありません。
標準的なVBAモジュールから新しいオブジェクトを参照するだけでなく、カスタムアプリケーションの一部であるUserFormの中で使用することもできます。
また、コマンドボタンやドロップダウンなど、ワークシート上にActive Xコントロールを配置した場合にも使用できます。これらのコントロールはすべてVBAを使用しており、新しいオブジェクトはこれらのコントロールのイベントコードに簡単に組み込むことができます。
また、作成したオブジェクトをExcelアドインにすることもできます。作成したオブジェクトは、そのアドインをロードしている他のユーザーも利用できるようになります。
これにより、Excelアプリケーションに独自の多層アーキテクチャを追加することができます。 Excelは多層構造のアプリケーションです。 クライアントサービス層は、ユーザーが慣れ親しんでいる実際のワークシートウィンドウを動かすものです。Excelオブジェクトモデルはその下にある次の層です。 VBAモジュールでF2を押すと、Excelのエンジンである膨大な数のオブジェクトとそれらのオブジェクトのメンバを見ることができます。 新しいオブジェクトもここに表示されることに注意してください。
最後に、これらすべての下に、ワークシートとセルに入力されたすべてのデータを保持するデータサービス層があります。 ExcelはこのデータにExcelオブジェクトモデルを使ってアクセスします。
クラスモジュールを作成すると、独自のカスタムオブジェクトやメンバーで Excel Object モジュールを拡張することができます。 この記事では、クラスモジュールを使って簡単なオブジェクトの階層を作成する方法について説明します。
クラスモジュールを使用する利点
- 様々なExcelアプリケーションで使用可能な堅牢なビルディングブロックを開発することができます。
- 一度徹底的にテストすれば、組み込みのExcelオブジェクトと同じように、常に正しい結果を生成することができます。
- アプリケーションの他の部分のコードが更新されても、新しいオブジェクトは同じように動作し続けます。
- 新しいオブジェクトはアドインとして他のExcelアプリケーションで使用することができます。
- オブジェクトは他のアプリケーションで再利用でき、デバッグに役立ちます。
クラスモジュールのデメリット
- 作成だけでなく、理解することも難しい部類に入ります。
- 通常のモジュール内でオブジェクトを使用する際に表示されるものなので、命名規則は非常に重要になります。
- クラスモジュールを作成したことがない場合、理解するのが難しく、学習曲線が急な場合があります。
- ランタイムに変更することが難しく、プロジェクトを再設定する必要があります。
- プロパティとプライベート変数が同じ名前を使ってしまうと、無限ループや、エラーの発生を招く可能性があります。
クラスモジュールの挿入
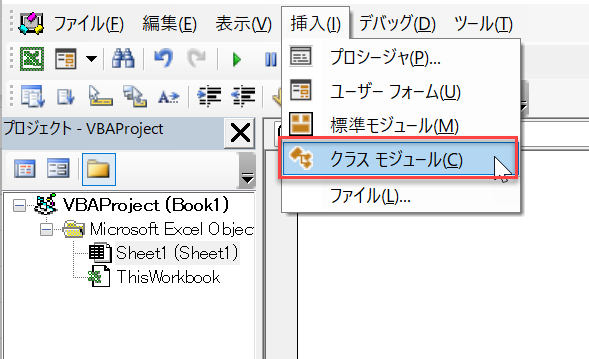
VBE (Visual Basic Editor)メニューから、挿入 > クラスモジュールを選択します。新しいクラスモジュールは自動的に「Class 1」という名前になりますが、これをすぐにオブジェクトに使用する名前に変更する必要があります。
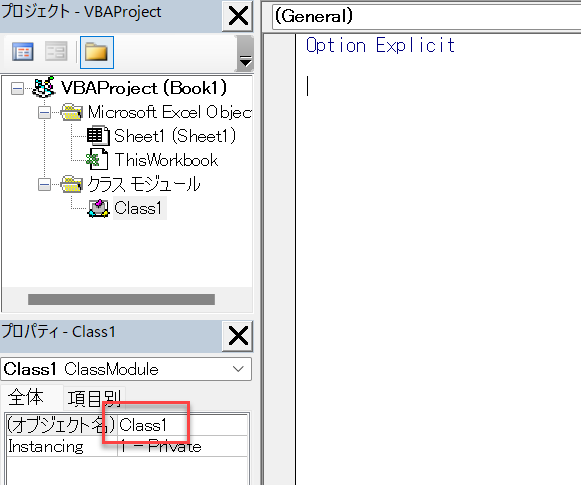
名前の変更は、プロパティウィンドウの赤枠で囲まれた部分で行います。 新しい名前を入力すると、クラスモジュールコレクションに表示される名前が変更されます。
プロパティウィンドウが表示されていない場合は、VBEメニューから表示 > プロパティを選択するか、F4キーを押してください。 新しいクラスモジュールをMyItemとし、プロジェクトエクスプローラのツリービューでその名前をダブルクリックして、そのコードウィンドウを表示してください。
オブジェクトアイテムの作成
この例では、MyItemsというトップレベルのオブジェクトを作成し、その下にMyItem」というメンバーオブジェクトを作成して、各アイテムの個別データを保持します。 作成されたオブジェクトは、内蔵のExcelオブジェクトと同じように動作します。例えば、ワークブック内の各ワークシートを集めた ‘Worksheets’ というオブジェクトがあります。また、ワークブック内の個々のワークシートを表す ‘Sheet’ というオブジェクトがあり、各ワークシートのすべてのプロパティとメソッドを保持しています。 このオブジェクトは、Worksheets コレクションオブジェクトに関連するものです。
Worksheets コレクションを繰り返し、各 Sheet を順番に表示することができます。 同様に MyItems コレクションでも Myitem メンバで作成したプロパティを繰り返し表示することができます。
このサブオブジェクトは、トップレベルオブジェクトのコレクション内に実際のアイテムを保持します。 これは、Excel の Sheet オブジェクト内のメンバー (例: name、visible、count) に相当するものです。 このコードは、MyItem というクラスモジュールに入力されています。
クラスモジュールには、プロパティとメソッドがあります。 プロパティは、事実上、変数のようにデータの値を保持するもので、メソッドはサブルーチンや関数のようなものです。 このサブオブジェクトには、ItemとDetailの2つのプロパティを作成する予定です。 最初に、プロパティの値を保持するために、2つの文字列変数を宣言する必要があります。
Private mItem As String
Private mDetail As String
これらは、モジュール全体のすべてのサブルーチンで使用できるように、クラスモジュールのコードの先頭にある宣言セクションで宣言される必要があります。
これから作成するプロパティとは異なるユニークな名前を付ける必要があるため、それぞれの名前の前に「m」(memberの意味)を付けています。
変数はPrivateとして宣言されているので、オブジェクトを使用している人からは見えません。 これはオブジェクトのコード内で使用するための作業変数であり、最終的なオブジェクトの一部ではありません。
次のステップは、2つのプロパティにアクセスするためのコードをセットアップすることです。これは、各プロパティに対して、Property Let と Property Get ステートメントを使用することで行います。 これらは Public でなければならず、そうでなければ、トップレベルのオブジェクトは外部から見えず、アクセスできなくなってしまいます。
Public Property Let Item(vdata As String)
      mItem = vdata
End Property

Public Property Get Item () As String
      Item = mItem
End Property

Public Property Let Detail (vdata As String)
      mDetail = vdata
End Property

Public Property Get Detail () As String
      Detail = mDetail
End Property
このコードは、モジュールの宣言セクションで定義された 2 つのプライベート変数を使用して、2 つのプロパティ、Item と Detail に値を読み書きする手段を作成します。
vdata パラメータは、該当するプロパティにデータを渡すために使用されます。 各プロパティには Let と Get ステートメントがあり、それぞれのケースでプロパティ名が同じであることが重要です。スペルを間違えると、2つの異なるプロパティを持つことになってしまうためです。 このコードを作成するために、VBEメニューの挿入 > プロシージャを使用して、与えられたプロパティ名に対する Get と Let プロパティの初期コードを作成するコードスケルトンを作成することができます。 これはポップアップウィンドウを表示し、プロパティ名を入力し、ラジオボタンで Property を選択するものです。
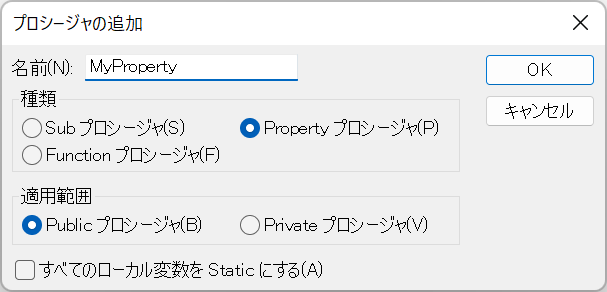
OKをクリックすると、スケルトンコードがクラスモジュールに追加されます。
Public Property Get MyProperty() As Variant

End Property

Public Property Let MyProperty(ByVal vNewValue As Variant)

End Property
こうすることで、プロパティ名の間違いを防ぐことができます。Public Property とEnd Property の間にコードを追加するだけです。
これでMyItemというオブジェクトができ、この演習のすべてのデータを保持することができます。
コレクションの作成
次の段階では、トップレベルのオブジェクトを Collection オブジェクトとして作成し、MyItem オブジェクトに設定したプロパティにアクセスできるようにします。 ここでも、MyItem オブジェクトで2つの文字列変数を定義したのと同じように、コレクションオブジェクトとして動作するワーキングオブジェクトを定義する必要があります。
Private mItems As Collectionここでも、名前の前に 「m (メンバーオブジェクト)」が付いているのはそのためです。また、新しいオブジェクトを使用するときに表示されないように Private として宣言されています。 次に、Class_Initialize コードを入力する必要があります。これはコード内でオブジェクトを最初に使用するときに実行され、どのような値がオブジェクトにロードされるかを決定します。 モジュールウィンドウの最初のドロップダウンで Class を選択し、2番目のドロップダウンで Initialize を選択すると、このサブルーチンにアクセスすることができます。
Private Sub Class_Initialize()
Dim objItem As MyItem
Set mItems = New Collection
For n = 1 To 3
    Set objItem = New MyItem
    objItem.Item = Worksheets("Sheet1").Range("a" & n).Value
    objItem.Detail = Worksheets("Sheet1").Range("b" & n).Value
    mItems.Add objItem
Next n
End Sub
このコードでは、先にクラスモジュールとして構築したMyItem の定義を使って、objItemというオブジェクトを設定しています。
そして、先に定義した mItems オブジェクトを元に新しい Collection を作成します。
ワークブックのSheet1上の値を繰り返し、MyItemオブジェクトのために作成したプロパティに格納します。 objItem を使用すると、Excel の組み込みオブジェクトを使用しているのと全く同じように、2つのプロパティを示すドロップダウンが表示されることに注意してください。
次に、アイテムオブジェクトはコレクションオブジェクトに追加され、プロパティ値のすべてのデータを保持するようになります。
入力データは、ワークシートから取得する必要はありません。 静的な値でも、Microsoft Access や SQL Server などのデータベースへの接続でも、他のワークシートからのデータでもかまいません。
続いて、アイテムという名前のパブリック関数を追加する必要があります。
Public Function Item(index As Integer) As MyItem
    Set Item = mItems.Item(index)
End Function
これにより、コレクションオブジェクト内の個々のオブジェクトをインデックス番号で参照することができます。 この関数は、バックグラウンドで mMyItems コレクションの中で起こっていることを映す「鏡」の役割を提供します。
また、Count というプロパティを追加して、MyItems コレクションにいくつの MyItem オブジェクトがあるかをコードで確認できるようにしておく必要があります。
Public Property Get Count() As Long
    Count = mItems.Count
End Property
この場合、読み取り専用なので Get プロパティだけが必要です。 これには、すでにCountプロパティが組み込まれているmItemsコレクションを使用します。 これで、オブジェクト MyItem で定義された完全な階層を持つオブジェクト (MyItems) ができました。 全体を動作させるには、ワークシート (Sheet1) にデータを入力し、クラスの初期化ルーチンがこれをオブジェクトに収集できるようにする必要があります。 スプレッドシートは次のようになります。

新しいオブジェクトの使用
これで、標準的な Excel VBA モジュールの中で Collection オブジェクト (MyItems) を使用できるようになりました。次のコードを入力してください。
Sub test_object()
Dim MyClass As New MyItems, n As Integer
MsgBox MyClass.Count
For n = 1 To MyClass.Count
    MsgBox MyClass.Item(n).Item
    MsgBox MyClass.Item(n).Detail
Next n
End Sub
このコードでは、MyItemsという名のコレクションオブジェクトを基に、MyClassというオブジェクトを作成しています。これは、ワークシートからオブジェクトにすべてのデータを抽出する Initializeルーチンを起動します。そしてコレクション内のアイテムの数を表示し、コレクション内を繰り返して Item と Detail のテキストを表示します。
コード内でMyClassオブジェクトを参照すると、2つのメンバープロパティのリストが表示され、正しいプロパティを追加するのに役立つことに気づくでしょう。
スプレッドシートの入力データのセルの値を変更すると、上記のコードを再度実行したときに、コレクション内の値が自動的に更新されます。これは、オブジェクトの範囲を変更すると、初期化ルーチンが実行されてすべての新しいデータが取り込まれるためです。
DimではなくStaticを使用すると、コードが継続的に実行されている限り、初期化ルーチンは実行されず、古い値が保持されます。 スプレッドシート上のデータが変更されても、オブジェクトには反映されません。
Sub Test_Static()
Static Myclass As New MyItems, n As Integer
For n = 1 To Myclass.Count
    MsgBox Myclass.Item(n).Item
    MsgBox Myclass.Item(n).Detail
Next n
End Sub
クラスモジュールを使ったオブジェクトの作成まとめ
このように、オブジェクトとして使用するクラスモジュールの階層を作成することは、ここで紹介した例のように単純な構造であっても、非常に複雑な作業です。 間違いを犯す可能性は非常に高いのです。
しかし、この方法は、コードをよりエレガントにし、読みやすくするという大きな利点があります。 また、アドインにすることで、他のExcelアプリケーションや開発者と共有することも容易になります。
この例では、データを保持するオブジェクトを作成する方法として、複数列のスプレッドシートデータを保持する多次元配列を作成し、配列内の各要素を更新または読み取るコードを記述するのが通常の方法でしょう。この方法では、おそらくかなり面倒なことになり、さまざまな要素のアドレス指定に間違いが生じる可能性があります。
新しいオブジェクトを作成すれば、そのオブジェクトとその下に作成したデータを保持するメンバを参照するだけでよいのです。
また、スプレッドシート(またはクラスモジュール内でデータソースとして使用している場合はリンクされたデータベース)のデータが変更された場合、「Dim」ステートメントを使用するたびに初期化ルーチンが呼び出され、データが即座に更新されます。配列に再投入するためのコードを書く必要はありません。
クラスモジュールを使用した変数リポジトリの作成
VBAのコードを書いていると、あちこちで変数を使うことになりますが、それらはすべて異なるスコープを持っています。 あるものは特定のプロシージャにのみ定義され、あるものは特定のモジュールに定義され、あるものはアプリケーション全体で使用可能なグローバル変数かもしれません。
クラスモジュールを作成すれば、多くの変数を保持することができ、オブジェクトなので、ユーザーフォームやワークシート上に配置した Active X コントロールなど、コード内のあらゆる場所で使用することができます。
さらに、変数オブジェクトを参照すると、そのオブジェクトに保持されているすべての変数名が昇順にソートされたリストが表示されるという利点もあります。
リポジトリを作成するには、新しいクラスモジュールを挿入する必要があります。これを行うには、VB Editor メニューの、挿入 > クラスモジュールを使用します。
この記事で説明したのと同じ方法で、名前を MyVariables に変更します。
次のコードを入力してください。
Private mV As Variant
Public Property Get Variable1() As Variant
Variable1 = mV
End Property

Public Property Let Variable1(ByVal vNewValue As Variant)
mV = vNewValue
End Property

Public Property Get Variable2() As Variant
Variable2 = mV
End Property

Public Property Let Variable2(ByVal vNewValue As Variant)
mV = vNewValue
End Property
このコードでは、2つの変数(Variable1 と Variable2)に対して Let と Get プロパティを設定しています。 LetプロパティとGetプロパティは、各変数の読み取り/書き込みのために必要です。 このコードにあるサンプルの変数名の代わりに、独自の変数名を使用することもできます。 変数 mV のプライベート宣言は、クラスモジュール内で値の転送にのみ使用される作業用変数を作成するためのものです。 変数リポジトリを使用するには、標準モジュールに次のコードを入力します。
Global VarRepo As New MyVariables
Sub TestVariableRepository()
MsgBox VarRepo.Variable1
VarRepo.Variable1 = 10
MsgBox VarRepo.Variable1
End Sub
このコードでは、作成した MyVariables オブジェクトのグローバルインスタンスを作成します。 この宣言は、コード内のどこからでも一度だけ行う必要があります。
このコードでは、まず Variable1 の値を表示し、それが空であることを示しています。 Variable1 に 10 という値が代入され、オブジェクト内の新しい値が表示され、このプロパティがこの値を保持していることが示されます。
MyVariables オブジェクトのインスタンスはグローバルに定義されているので、コード内のどこからでもオブジェクト内の定義された変数を参照することができます。
このことは、コードを書く上で変数を使いたい場合、グローバル変数を1つ定義するだけで、そのインスタンスから全ての変数に自由にアクセスし、変更できるという大きな利点があります。
オブジェクトをアドインにする
ここまでは、オブジェクトを作成するためのコードは、ワークブックアプリケーションの中にあることを前提としていました。 しかし、オブジェクトを他の開発者と共有したり、自分の他のExcelアプリケーションで使用したい場合、それをアドインにすることができます。
そのために必要なことは、ファイルをAdd-Inとして保存することだけです。 ファイル > 名前を付けて保存、を選択すると、ブラウザウィンドウが表示されます。 ファイルタイプのドロップダウンから、アドイン(.xlam)としてファイルタイプを選択し、[OK]をクリックします。 ファイルは、デフォルトではアドイン用フォルダに保存されますが、場所を変更することもできます。 その後、アドインファイルをExcelアプリケーションに組み込むことができるようになり、あなたが作成した新しいオブジェクトを柔軟に活用することが可能になります。

Excel に新しいアドインを組み込むには、Excel リボンの [ファイル] をクリックし、左側ペインの下部にある [オプション] をクリックします。
表示されたポップアップウィンドウの左側ペインで「アドイン」をクリックします。 ウィンドウの一番下に「設定」と書かれたボタンがあります。
これをクリックすると、「アドイン」ポップアップウィンドウが表示されます。「参照」をクリックし、アドインファイルを探します。これで、コード内でオブジェクトを参照することができるようになります。