VBA ユーザーフォームの作成
In this Article
このチュートリアルでは、VBAのユーザーフォームについて説明します。
VBA ユーザーフォーム
ユーザーフォームは、VBAでプログラミングをする上で非常に重要な部分です。 この機能により、VBAアプリケーションのユーザーとコミュニケーションをとるためのプロフェッショナルなユーザーインターフェイスを構築することができます。 また、ユーザーがワークブックに対して行っていることを完全に制御することもできます。
もちろん、ワークシートセルを使ってユーザーからパラメータを受け取ることもできますが、ユーザーフォームははるかに優れたユーザーエクスペリエンスを実現します。 ユーザーフォームの高さと幅をExcelウィンドウのサイズに合わせれば、Excelをホストとして使っていることを意識させずに、通常のWindowsアプリケーションのように見せることができます。
ドロップダウン、リストボックス、チックボックスなど、通常のWindowsのコントロールはすべて利用可能です。 また、ユーザーエクスペリエンスを向上させるために、さまざまなメソッド、イベント、プロパティを使用することができます。
重要な点は、ビルトインまたはモーダルのユーザーフォームを表示した場合、VBEでコードを編集したり、Excelの機能にアクセスすることはできないということです。 フォームが閉じられたときだけ、カーソルがコードに表示されます。
VBAの組み込みユーザーフォーム
Excel VBAには、ユーザーとのコミュニケーションに使用できるいくつかの組み込みフォームがあります。
メッセージボックス
これは、VBAで最も一般的に使用されるフォームです。 これは単にテキストメッセージを表示するもので、無効な入力があったことや、VBAプロセスの実行が終了したことをユーザーに通知する場合もあります。 最も単純な形では、テキスト文字列を表示しますが、疑問符や感嘆符などのアイコンを追加したり、メッセージボックスに別のタイトルを付けたりすることも可能です。
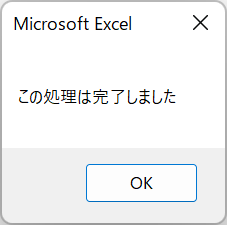
これは基本的な例です。クリックするボタンは1つだけで、タイトルバーには Microsoft Excel と表示されています。
これを生成するためのコードは非常に簡単です。
Sub TestMsgBox()
MsgBox "この処理は完了しました"
End Sub
パラメータを追加して、ボタンやアイコンを追加したり、タイトルバーを変更したりすることができます。
Sub TestMsgBox()
Dim Ret As Variant
Ret = MsgBox("本当に実行しますか?", vbYesNo Or vbQuestion, "My Application")
If Ret = vbYes Then
    '処理を記述
Else
    Exit Sub
End If
End Sub
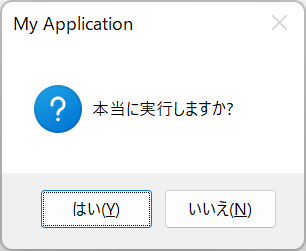
このコードでは、「はい」「いいえ」ボタンとクエスチョンマークアイコンを追加し、タイトルバーを設定します。メッセージボックスのスタイルは、Or演算子を使って組み合わせることもできます。
なお、メッセージボックスから値を得る場合、それを格納する変数はバリアントまたはvbMsgBoxResultとして定義する必要があり、メッセージボックスのステートメントは括弧を使用する必要があります。
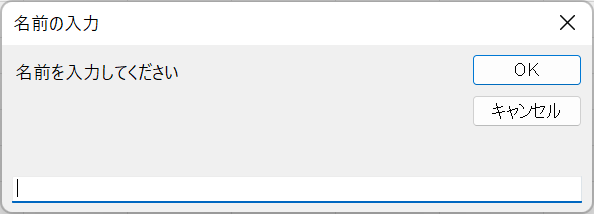
入力ボックス
VBAには非常にシンプルな入力ボックスが組み込まれていますが、それでできることはかなり限定されています。 できれば、カスタムのユーザーフォームをデザインしたほうがよいでしょう。
SUb TestInputBox()
Dim Ret As String
Ret = InputBox("名前を入力してください", "名前の入力")
MsgBox Ret
End Sub
また、パラメータに入力のためのデフォルト値を追加することもできます。
ファイルを開く
VBAのコードの中でWindowsのファイルダイアログを利用することができます。 実行中のユーザーには非常に印象的に見えますが、組み込むのは非常に簡単で、自動的にすべてのファイルダイアログの機能を一緒に手に入れることができます。

このコードでは、ユーザが見ることができるのはExcelファイルだけに制限されています。残念ながら、ユーザーはファイル名ボックスにExcel以外のファイル名を入力して、開くボタンをクリックすることができるので、Excelファイルが選択されたことを確認するためのコードが必要になります。
ファイルダイアログを表示する前に、ChDirコマンドを使って、デフォルトのディレクトリを自分の好きなように変更してください。 FileFilterパラメータでワイルドカードを使用していることに注意してください。
表示されるExcelファイルは2007以前のものであったり、マクロがあったり、バイナリであったりするので、’.xls*’というフィルタリングが行われます。
Sub TestFileDialog()
Dim MyFile As String
ChDir "C:\VBA Folder"
MyFile = Application.GetOpenFilename("Excel Files (*.xls*),*.xls*", , "Select a file")
MsgBox MyFile
End Sub
必要に応じて、MultiSelectパラメータを使用して、ユーザーが一度に複数のファイルを選択できるようにすることができます。 デフォルトはFalse(単一選択のみ)です。
Sub TestFileDialog()
Dim MyFile As Variant
ChDir "C:\VBA Folder"
MyFile = Application.GetOpenFilename("Excel Files (*.xls*),*.xls*", , "Select a file", , True)
For Each f In MyFile
    MsgBox f
Next f
End Sub
ユーザはファイルダイアログでShiftキーを押しながら複数のファイルを選択します。 For Eachループで、選択された各ファイルのフルパスとファイル名を表示します。
Excelのデフォルトダイアログ
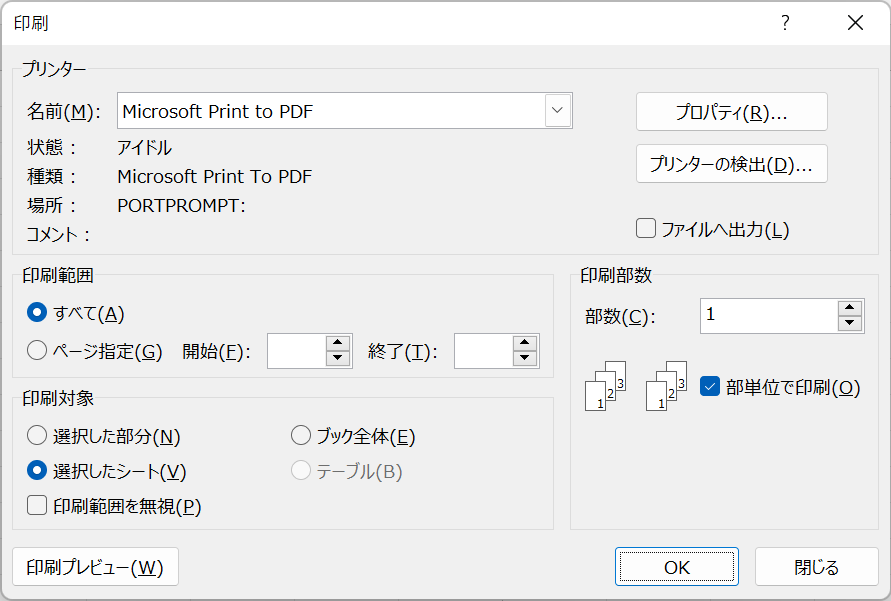
Excel VBAには、Excelの標準的なダイアログを表示するために使用するDialogsコレクションがあります。 ユーザーが選択したパラメータにアクセスしたり、ダイアログの外観を変更したりすることはできませんが、これらのダイアログは、ユーザーに標準的なExcel関数を案内したり、ダイアログ内で特定のパラメータを選択させたりするのに便利です。 この良い例が、VBAから「印刷」ダイアログを表示することです。
Sub TestPrintDialog()
Application.Dialogs(xlDialogPrint).Show
End Sub
ダイアログコレクションの括弧を開くと、組み込みダイアログのための膨大な数の定数のリストが表示されます。これらのオプションのいくつかを、あなたのコードで試してみる価値はあるでしょう。
新しいユーザーフォームの挿入
Visual Basic Editor(VBE)にユーザーフォームを挿入することで、独自のユーザーフォームを設計することができます。
VBEメニューバーの[挿入]-[ユーザーフォーム]を選択することで行えます。

「ユーザーフォーム」をクリックすると、新しい空白のフォームが表示され、開発できるようになります。
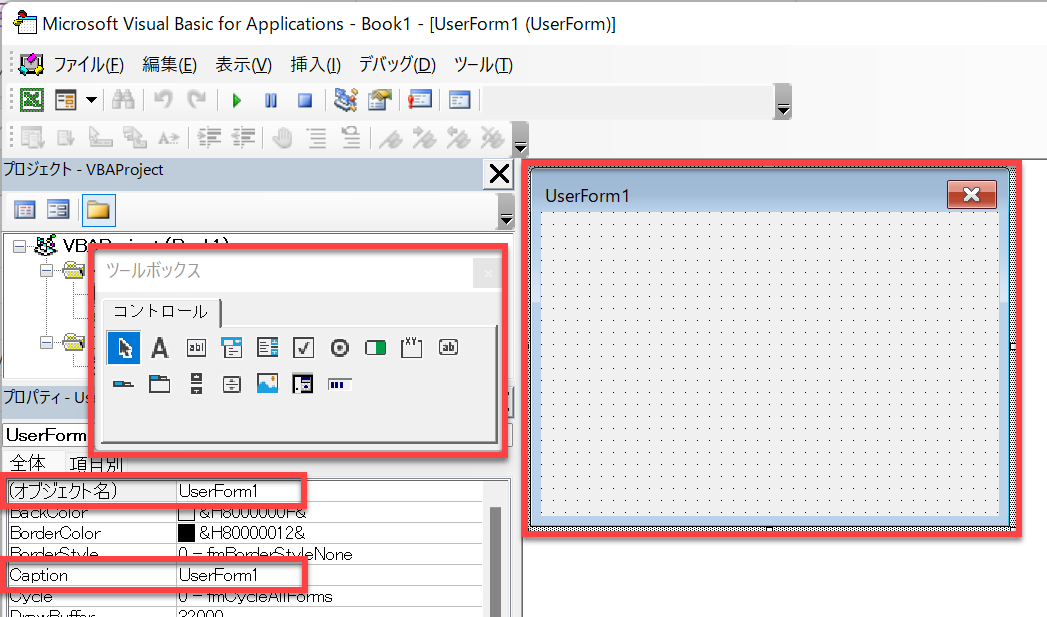
実際のフォーム(UserForm1と表示)はかなり小さく見えますが、周りのハンドルをカーソルでドラッグして拡大したり、さらに小さくしたりすることが可能です。
画面の左下には、プロパティウィンドウがあります。 フォーカスが直接フォーム自体に当たっているので、ここにはそのフォームに固有のすべてのプロパティが含まれています。
コンボボックスやコマンドボタンなどのコントロールを追加し始めると、これらのコントロールはすべて独自のプロパティを持っており、それぞれでできることが大きく異なることに注意してください。
現在表示されているプロパティは、フォーム自体にのみ適用されます。
「オブジェクト名」プロパティは、VBAコード内でフォームオブジェクトを識別するために使用される名前です。 オブジェクト名には、より意味のあるものを使用すると、コードを見直したときに、どのフォームが使用されているかが一目瞭然になります。
「オブジェクト名」プロパティは、画面左上の「プロジェクトエクスプローラ」ウィンドウにも反映されます。
フォームのタイトルバーを UserForm1 以外のものに変更したい場合は、 Caption プロパティに新しいテキストを入力することで行います。
フォームがユーザーからどのように見えるかについては、非常に多くの変更を行うことができます。 色の変更、企業ロゴなどの画像の追加、Left と Top による位置の変更、Height と Width によるサイズの変更、マウスポインタの変更など、さまざまな変更が可能です。 これらのプロパティは、フォームに追加したコントロールに対してプログラム的に変更することも可能です。 例えば、ユーザーがリストボックスから選択した場合、その選択内容に応じて他のコントロールを無効化したり、非表示にしたりすることができます。
ツールボックスの使用
フォーム自体をクリックすると、ツールボックスのポップアップが表示されることにお気づきでしょう。 他の場所(例えばプロパティペイン)をクリックするとポップアップは消え、フォームをクリックすると再び表示されます。
ツールボックスは、フォームのデザインに必要な機能を提供します。 これにより、ユーザーが慣れ親しんでいる通常の Windows コントロールをフォームに追加することができます。
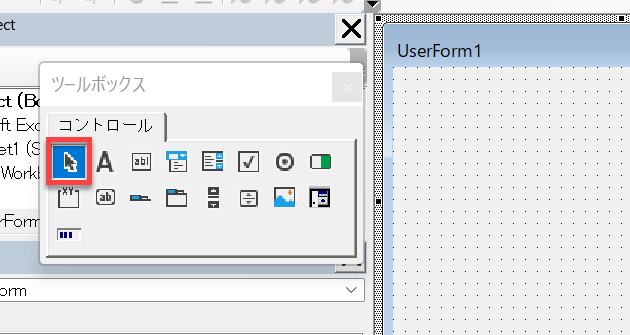
フォーム上に、多くのドットが表示されていることにお気づきでしょう。これは「スナップグリッド」と呼ばれるもので、フォームにコントロールを追加すると、自動的にドットの行と列に位置が合わせられるようになっています。 これにより、コントロールの位置合わせに非常に役立ち、コントロールの外観がちぐはぐになるのを防ぐことができます。
コントロールのクリック後、使用しない場合は、ツールボックスの左上にある「矢印」アイコンをクリックすると、カーソルが通常の位置に戻ります。
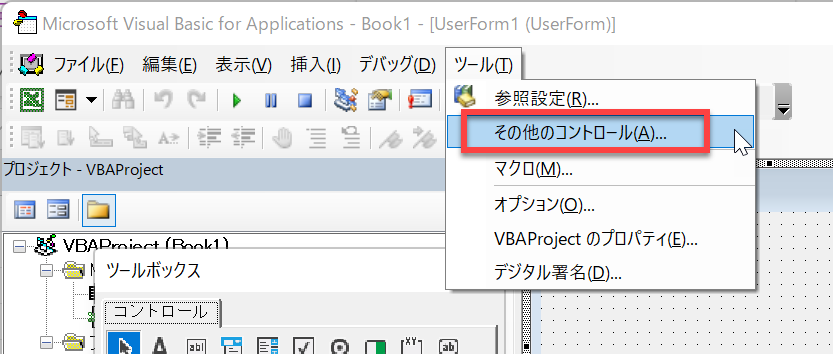
VBEメニューの「ツール」→「その他のコントロール」で、ツールボックスにコントロールを追加することができます。 これらのコントロールはかなりの数が用意されていますが、WindowsやExcelのバージョンによっては必ずしも動作しないため、あらかじめ実験しておかなければならないことがよくあります。
また、ユーザーがこれらの追加コントロールにアクセスできない場合や、古いバージョンのWindowsやExcelを使用している場合、問題を引き起こす可能性があります。大規模な組織、特にグローバルな組織では、頼りになる標準的なPCというものは、多くの場合、存在しないものです。
フォームに終了ボタンを追加
コマンドボタンをフォームに追加するのは簡単です。 これは、他のWindowsフォームで見られるボタンと同じように見えます。通常は、「OK」または「キャンセル」ボタンです。
ツールボックスの「コマンドボタン」アイコンをクリックします。これは、アイコンの下の列の左から2番目のアイコンです。 上の画像を見てください。abという文字が書かれているボタンがそれです。
マウスボタンを押したままフォームにドラッグするか、カーソルをフォームに移動させると、カーソルが「十字」に変わり、ボタンの位置やサイズを設定することができます。 コントロールをフォームにドラッグした場合、ボタンのサイズはデフォルトのままです。カーソルをフォームに移動すると、「十字」カーソルをフォーム上でドラッグしてボタンのサイズを変更することができます。 これで、フォームは次のようになります。

ボタンにはデフォルトのテキストがキャプションとして設定されていますが、自分の必要なものに変更したいと思うでしょう。 ボタン (‘CommandButton1’) 内のテキストをクリックすると、キャプションを直接編集することができます。
また、プロパティウィンドウ(画面の左下隅)でも変更できます。 Captionというプロパティが表示されていますので、その値を編集してください。 これを「終了」に変更します。
フォームのプロパティと同様に、「オブジェクト名」プロパティは、VBAコードで使用される名前を定義します。より意味のある、コード内で明白な名前を使用するのが良いでしょう。
また、ボタンのハンドル(白い四角い箱)をクリックし、ハンドルをドラッグしてボタンのサイズを変更することができます。
また、プロパティ・ウィンドウで高さと幅の値を変更することによっても、ボタンのサイズを変更することができます。
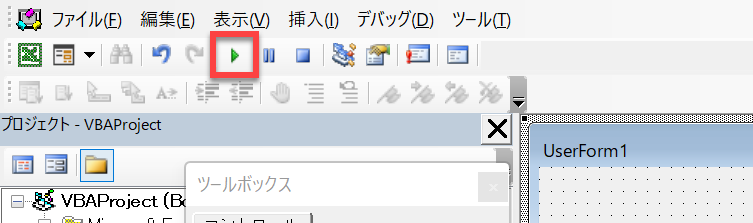
VBEツールバーの緑の三角形をクリックするか、F5キーを押すと、Excelでフォームを表示することができます。
モジュール内のVBAコードからフォームを呼び出すには、Showメソッドを使用します。
Sub ShowForm()
UserForm1.Show
End Sub
ユーザーフォームは事実上グローバルオブジェクトであり、コード内の任意の場所から呼び出すことができます。
現在、コマンドボタンは何もしませんが、これは対応するVBAコードがないからです。これは自分で書かなければなりません。現在できることは、フォームの右上にある X をクリックしてフォームを閉じることだけです。
VBAのコードを追加するには、フォーム上のボタンをダブルクリックします。
すると、通常のVBAコードウィンドウが表示され、デフォルトのイベントであるclickが表示されます。 フォームを閉じるには「Hide」メソッドを使用します。また、何が起こったかをユーザーに確認するためのメッセージボックスなど、他のコードを追加することもできます。
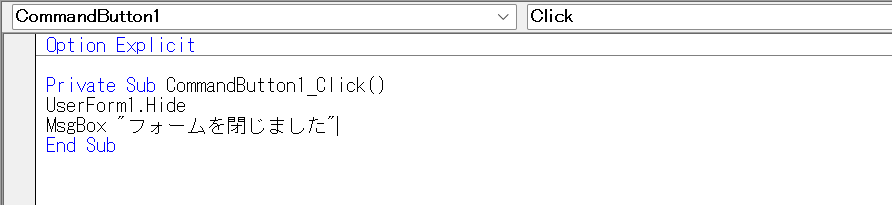
コードウィンドウの上部には、2つのドロップダウンがあることに注意してください。 最初のドロップダウンではフォームコントロールを選択し、2 番目のドロップダウンではコードを追加できるすべてのイベントが表示されます。 ボタンの場合はClickイベントですが、他にもDbClickやMouseMoveなどがあります。
これでフォームを実行すると、ボタンは実際に何かをします。 フォームが消え、フォームが閉じられたことを確認するメッセージボックスが表示されます。
もちろん、終了コードを拡張することもできます。別のフォームを表示したり、ユーザーがフォームに入力したパラメーターに対してアクションを起こしたりすることができます。
フォームにラベルコントロールを追加
ラベルコントロールは、テキストボックスやドロップダウンなど、フォーム上のコントロールに入力する必要があるデータの種類をユーザーに知らせるためのものです。 ラベルは、デフォルトではボーダーを持ちませんが、必要に応じてプロパティウィンドウでボーダーを追加することができます。
ラベルはコントロールのため、ユーザーには読み取り専用となり、太字の見出しや、入力や選択の指示など、単純にテキストをフォームに表示する方法となります。
ラベルを追加するには、ツールボックスの「A」アイコン(上段、左から2番目)をフォーム上にドラッグするか、クリック後にカーソルをフォームに移動して位置とサイズを選択します。
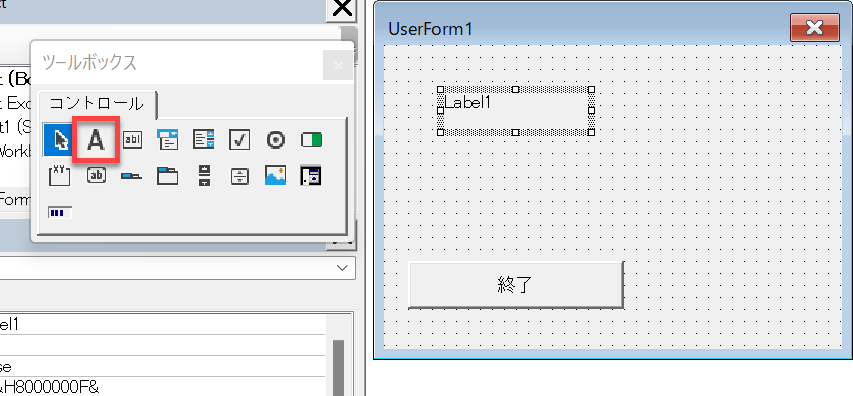
プロパティウィンドウのCaptionプロパティを使用するか、ラベルコントロールをクリックすると、ラベルコントロールのテキストを入力することができます。
なお、テキストはラベルコントロールのサイズに応じて折り返され、テキスト文字列が長すぎるとフォームに完全に表示されないので、ラベルコントロールのサイズに注意する必要があります。
プロパティウィンドウを使用すると、色やフォント、背景など、ラベルコントロールの外観を変更することができます。
ラベルコントロールのためにコードを作成する必要はありません。 なぜなら、ラベルコントロールの主な目的は、フォームにテキストを追加して、ユーザーが他のすべてのコントロールの動作を確認できるようにすることであるためです。
フォームにテキストコントロールを追加
テキストコントロールは、ユーザーが名前やコメントなどのテキストを入力するために使用されます。
テキストコントロールは、ツールボックスのテキストコントロールアイコン(上段、左から3番目)をクリックし、ダブルクリックするか、フォームの所定の位置にドラッグすることで追加できます。
テキストコントロールはラベルコントロールと混同されがちですが、ユーザー入力のためのコントロールはテキストコントロールの方です。

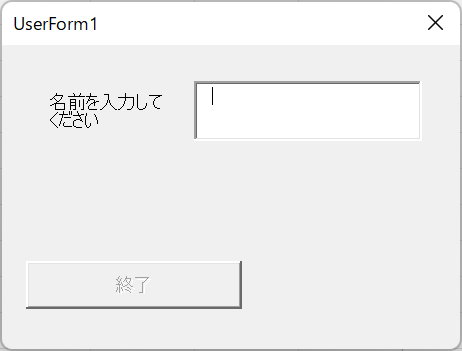
「名前を入力してください」というテキストは、前述のようにラベルコントロールで、ユーザーが何かを入力できるように、白いテキストボックスが用意されています。
プロパティウィンドウでは、テキストボックスの色、フォント、特殊効果、パスワード文字などを変更することができます。 非常に柔軟な対応が可能です。
テキストボックスのプロパティで非常に重要なものの1つに、MultiLineプロパティがあります。 コメントなど大量のテキストを入力させる場合は、MultiLineプロパティをTrueに設定する必要があります。
デフォルトの False のままでは、テキストボックスをどんなに大きくしても、入力されたテキストは 1 つの連続した行に留まり、テキストボックスからスクロールして出ていきます。 テキストはボックス内で折り返されることはありません。
実行中にテキストボックスを右クリックしてもポップアップは表示されませんが、CTRL+Vで貼り付け、CTRL+Cで切り取りを行うことができます。
ここでも、ユーザーが入力したテキストを処理するための独自のコードを記述する必要があります。ユーザーが入力したテキストをワークシートのセルに転送することもできます。
次のコードをテキストボックスのChangeイベントに追加しましょう。
Private Sub TextBox1_Change()
Sheets("Sheet1").Range("A1").Value = TextBox1.Value
End Sub
また、ユーザがゴミを入力してアプリケーションに悪影響を与えないようにするための検証コードも追加しておくとよいでしょう。
Change イベントは、ユーザーが新しい文字を入力するたびに呼び出されるため、実はこの用途には適していません。ユーザーは、文字列を入力し始めてそれが完成する前に、テキストが適切でないことに即座に気づくことが出来るかもしれませんが。
こういうときには、Exit イベントを使用します。 これは、ユーザーがフォーム上の別のコントロールにフォーカスを移したとき、つまりユーザーがデータの入力を終えて、次の処理に移ろうとするときに発生します。
Private Sub TextBox1_Exit(ByVal Cancel As MSForms.ReturnBoolean)
If IsNull(TextBox1.Value) Or Len(TextBox1.Value) < 4 Then
    MsgBox "名前が無効です", vbCritical
    TextBox1.SetFocus
End If
End Sub
ユーザーがフォーム上の別のコントロールをクリックすると、このコードでは、テキストボックス内の値が NULL か、4 文字未満であるかをテストします。 テストが真であれば、名前が無効であることを知らせるクリティカルアイコン付きのメッセージボックスが表示され、フォーカスが問題のテキストボックスに戻され、ユーザーが修正できるようになります。
ユーザーが終了ボタンをクリックしても、テキストボックスのExitイベントが先に実行されるため、ユーザーが入力を修正せずに終了することを防ぐことができます。
フォームの初期化とアクティブ化
VBA が最初にフォームを作成し構築するとき、Initializeイベントがトリガーされます。 しかし、この時点ではフォームも表示されているので、Activateイベントもトリガーされます。 それ以降、フォームが Show メソッドで表示されるたびに、 あるいはフォームの階層構造の一部として表示されるたびに Activate イベントが発生しますが、 Initialize イベントは発生しません。
Initialize イベントは一度しか発生しませんが、 Activate イベントは何度でも発生します。
フォームのテキストボックスなどの入力コントロールに、 ワークシートのデフォルト値を設定しておくと、 フォームを最初に使用したときにその値が表示されるようになりますが、 ユーザーはデフォルト値を上書きすることができ、 コードが実行されている間はその新しい値がそのまま残ります。
Private Sub UserForm_Initialize()
TextBox1.Value = Sheets("Sheet1").Range("A1").Value
If TextBox1.Value = "" Then
	TextBox1.Visible = False
Else
	TextBox1.Visible = True
End If
End Sub
Initializeイベントはコードウィンドウの2番目のドロップダウンにあり、ユーザーフォーム名は1番目のドロップダウンにあります。
このコードでは、Sheet1のセル A1 の値を、この記事の前半で作成したテキストボックスのデフォルト値として使用します。 フォームが初めて表示されたとき、デフォルト値が表示されます。その後、ユーザーがデフォルト値を上書きすることができ、その値は保持されます。 CellA1 が空白の場合、テキストボックスは非表示になり、それ以外の場合は表示されます。
デフォルト値はハードコーディングすることもできます。
TextBox1.Value = "John Smith"また、ユーザーが入力した値は、そのExcelセッションでそのフォームを起動したときにいつでも再表示されるようにしたい場合もあります。VBA のコードでは、コントロールの ‘Exit’ イベントを使用して値をワークブック内のセルに書き戻し、フォームの ‘Activate’ イベントを使用して値を再インストールすることが簡単にできます。
Private Sub TextBox1_Exit(ByVal Cancel as MSForms.ReturnBoolean)
Sheets("Sheet1").Range("A10").Value = TextBox1.Value
End Sub
Private Sub UserForm_Activate()
TextBox1.Value = Sheets("Sheet1").Range("A10").Value
End Sub
このコードによって、ユーザーの値を永続化し、ワークブックの残りの部分と一緒に保存することができます。
アプリケーションとフォームの保存
フォームを含む Excel ワークブックを保存すると、すべてのフォームとその VBA コードも一緒に保存されます。しかし、フォームが保持していた値はすべて失われます。
ユーザーがワークブックやフォームを終了するときに、値がワークブック内のセルに書き戻され、保存されるようにコードを記述することが重要です。
モーダルフォームと非モーダルフォーム
フォーム自体には、ShowModalというプロパティがあります。 これはデフォルトでTrueに設定されていますが、False(非モーダル)に変更することができます。

フォームがモーダルである場合、フォームが表示されている間は、Excelのどの機能にもアクセスできないことを意味します。これには、VBEウィンドウ内のコードも含まれます。 コードを表示することはできますが、カーソルやキーボードは使用できません。
非モーダルフォームでは、フォームが表示されている間、VBEウィンドウを含むすべてのExcel機能にアクセスすることができます。
これは、ユーザーの行動を制御するという観点から重要です。
フォームを閉じる
どんなにうまくコードを書いてユーザーを特定のルートに誘導しても、ユーザーはフォームの右上にあるXボタンをクリックしてフォームを閉じることで、簡単にそれを回避することができてしまいます。
これを防ぐには、フォームの QueryClose イベントを変更します。
Private Sub UserForm_QueryClose(Cancel As Integer, CloseMode As Integer)
Cancel = True
MsgBox "このアクションは無効です"
End Sub
QueryClose イベントは、ユーザーがフォームを閉じようとして Xボタン をクリックすると発生します。 このコードによってアクションがキャンセルされるため、ユーザーは 終了ボタンを使用するしかなく、その際に必要な処理を実施することが出来るようになります。
コントロールの有効化・無効化
フォーム上のすべてのコントロールには、Enabledというプロパティがあり、TrueかFalseに設定されています。 False に設定すると、そのコントロールはグレーアウトし、見ることはできますが、使用することはできません。
また、Visibleというプロパティもあり、これもTrueまたはFalseに設定されます。
あるコントロールを使用不可能にしたり、ユーザーから完全に見えなくするコードを書くことができます。Ifステートメントを使用することで、この処理を行う必要がある状況を選択することができます。
例えば、ユーザーがテキストボックス1(名前)に値を入力するまで、終了ボタンを無効にしておくことができます。
Private Sub UserForm_Initialize()
CommandButton1.Enabled = False
End Sub
Private Sub TextBox1_Change()
If Len(TextBox1.Value) > 0 Then
    CommandButton1.Enabled = True
Else
    CommandButton1.Enabled = False
End If
End Sub
このコードでは、フォームの Initialize イベントを使用して、フォームが最初に表示されたときに終了ボタン (CommandButton1) を無効にし、TextBox1 の Change イベントを使用して、何かが入力された場合は終了ボタンを有効に、ボックスが空の場合は無効にしています。
Change イベントは、テキストボックスに新しい文字が入力されたり削除されたりするたびに発生するので、もしユーザーがボタンを有効にするためにテキストを入力しようとしても、その後すべてのテキストを削除すると、ボタンは即座に無効化されます。