VBA: Improve Speed & Other Best Practices
Written by
Reviewed by
In this Article
This tutorial will discuss how to speed up VBA Macros and other VBA best practices.
Settings to Speed Up VBA Code
Below you will find several tips to speed up your VBA code. The tips are loosely organized by importance.
The easiest way to improve the speed of your VBA code is by disabling ScreenUpdating and disabling Automatic Calculations. These settings should be disabled in all large procedures.
Disable Screen Updating
By default, Excel will display changes to workbook(s) in real-time as VBA code runs. This causes a massive slowdown in processing speed as Excel most interpret and display changes for each line of code.
Application.ScreenUpdating = FalseAt the end of your macro, you should turn back on Screen Updating:
Application.ScreenUpdating = TrueWhile your code is running, you may need to “refresh” the screen. There is no “refresh” command. Instead, you will need to turn Screen Updating back on and disable it again.
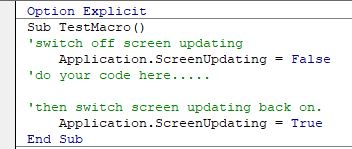
In practice, your macro should look like this:
Set Calculations to Manual
Whenever a cell value is changed, Excel must follow the “calculation tree” to recalculate all dependent cells. Additionally, whenever a formula is changed, Excel will need to update the “calculation tree” in addition to re-calculating all dependent cells. Depending on your workbook size, these recalculations can cause your macros to run unreasonably slow.
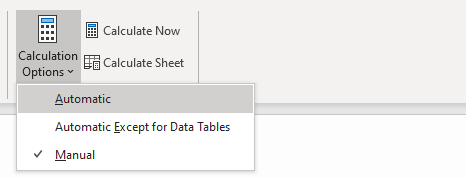
To set Calculations to Manual:
Application.Calculation = xlManualTo manually re-calculate the entire workbook:
CalculateNote you can also calculate only a sheet, range, or individual cell, if necessary for improved speed.
To restore Automatic Calculations (at the end of your procedure):
Application.Calculation = xlAutomaticImportant! This is an Excel setting. If you don’t re-set calculations to automatic your workbook will not re-calculate until you tell it to.
In practice, your macro will look like this:

You’ll see the biggest improvements from the above settings, but there are several other settings that can make a difference.
Risks Involved when Changing these Default Settings
Excel by default has the Screen Updating set to TRUE and the Calculations set to Automatic. Using the code to switch off these settings in the Application will speed up your code considerably. However, if we forget to switch these setting BACK ON, or if the code stops running before it gets to the lines of code that reset these settings, you might end up with an unresponsive Excel Screen (as the Screen will not update) or calculations that will not calculate unless you manually do so.
To solve this problem, always make sure you have an error trap in your code so that if an error does occur to stop the macro, make sure the macro jumps down to the lines of code that reset these settings.
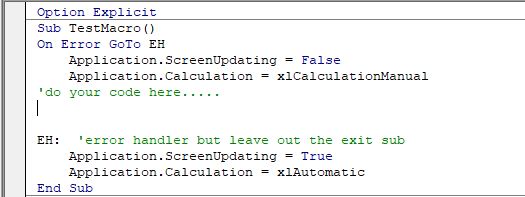
In the above example, we have created an Error Handler called EH. If something goes wrong in the code, the macro will jump down to the EH and run the last 2 lines of code. As we have NOT put an Exit Sub in the macro above the error handler, if the macro runs perfectly, it will get to the 2 lines of code and reset these settings back to the default.
Other Settings
Disable Events
Events are “triggers” that cause special event procedures to run. Examples include: when any cell on a worksheet changes, when a worksheet is activated, when a workbook is opened, before a workbook is saved, etc.
Disabling events can cause minor speed improvements when any macros run, but the speed improvement can be much greater if your workbook uses events. And in some cases disabling events is necessary to avoid creating endless loops.
To disable events:
Application.EnableEvents = FalseTo turn events back on:
Application.EnableEvents = TrueDisable PageBreaks
Disabling PageBreaks can help in certain situations:
- You’ve previously set a PageSetup property for the relevant worksheet and your VBA procedure modifies the properties of many rows or columns
- OR Your VBA procedure forces Excel to calculate pagebreaks (displaying Print Preview or modifying any properties of PageSetup).
To disable PageBreaks:
ActiveSheet.DisplayPageBreaks = FalseTo re-enable PageBreaks:
ActiveSheet.DisplayPageBreaks = TrueBest Practices to Improve VBA Speed
Avoid Activating and Selecting
When you record a Macro, you’ll see many Activate and Select methods:
Sub Slow_Example()
    Sheets("Sheet2").Select
    Range("D9").Select
    ActiveCell.FormulaR1C1 = "example"
    Range("D12").Select
    ActiveCell.FormulaR1C1 = "demo"
    Range("D13").Select
End Sub
Activating and selecting objects is usually unnecessary, they add clutter to your code, and they are very time-consuming. You should avoid this methods when possible.
Improved Example:
Sub Fast_Example()
    Sheets("Sheet2").Range("D9").FormulaR1C1 = "example"
    Sheets("Sheet2").Range("D12").FormulaR1C1 = "demo"
End Sub
Avoid Copying and Pasting
Copying requires significant memory. Unfortunately, you can’t tell VBA to clear internal memory. Instead Excel will clear it’s internal memory at (seemingly) specific intervals. So if you perform many copy and paste operations you run the risk of hogging too much memory, which can drastically slow down your code or even crash Excel.
Instead of copying and pasting, consider setting the value properties of cells.
Sub CopyPaste()

    'Slower
    Range("a1:a1000").Copy Range("b1:b1000")

    'Faster
    Range("b1:b1000").Value = Range("a1:a1000").Value

End Sub
Use the For Each loops instead of For Loops
When looping through objects, the For Each loop is faster than the For Loop. Example:
This For Loop:
Sub Loop1()
    dim i as Integer
    For i = 1 To 100
        Cells(i, 1).Value = 1
    Next i
End SubSub Loop2()
Dim cell As Range
For Each cell In Range("a1:a100")
cell.Value = 1
Next cell
End SubDeclare Variables / Use Option Explicit
Option ExplicitSub OptionExplicit()
var1 = 10
MsgBox varl
End SubUse With – End With Statements
Sub Faster_Example()
    With Sheets("Sheet2")
        .Range("D9").FormulaR1C1 = "example"
        .Range("D12").FormulaR1C1 = "demo"
        .Range("D9").Font.Bold = True
        .Range("D12").Font.Bold = True
    End With
End SubSub Slow_Example()
Sheets("Sheet2").Range("D9").FormulaR1C1 = "example"
Sheets("Sheet2").Range("D12").FormulaR1C1 = "demo"
Sheets("Sheet2").Range("D9").Font.Bold = True
Sheets("Sheet2").Range("D12").Font.Bold = True
End SubAdvanced Best Practice Tips
Protect UserInterfaceOnly
It’s good practice to protect your worksheets from editing unprotected cells to prevent the end-user (or you!) from accidentally corrupting the workbook. However, this will also protect the worksheet(s) from allowing VBA to make changes. So you must unprotect and re-protect worksheets, which is very time consuming when done on many sheets.
Sub UnProtectSheet()
    Sheets(“sheet1”).Unprotect ”password”
    'Edit Sheet1
    Sheets(“sheet1”).Protect ”password”
End Sub
Instead, you can protect sheets with setting UserInterfaceOnly:=True. This allows VBA to make changes to sheets, while still protecting them from the user.
Sheets(“sheet1”).Protect Password:="password", UserInterFaceOnly:=TrueImportant! UserInterFaceOnly resets to False every time the workbook opens. So to use this awesome feature, you will need to use the Workbook_Open or Auto_Open events to set the setting each time the workbook is opened.
Place this code in the Thisworkbook module:
Private Sub Workbook_Open()
    Dim ws As Worksheet
    For Each ws In Worksheets
        ws.Protect Password:="password", UserInterFaceOnly:=True
    Next ws
End Sub
or this code in any regular module:
Private Sub Auto_Open()
    Dim ws As Worksheet
    For Each ws In Worksheets
        ws.Protect Password:="password", UserInterFaceOnly:=True
    Next ws
End Sub
Use Arrays to Edit Large Ranges
It can be very time consuming to manipulate large ranges of cells (Ex. 100,000+). Instead of looping through ranges of cells, manipulating each cell, you can load the cells into an array, process each item in the array, and then output the array back into their original cells. Loading the cells into arrays for manipulation can be much faster.
Sub LoopRange()

    Dim cell As Range
    Dim tStart As Double

    tStart = Timer

    For Each cell In Range("A1:A100000")
        cell.Value = cell.Value * 100
    Next cell

    Debug.Print (Timer - tStart) & " seconds"

End Sub

Sub LoopArray()

    Dim arr As Variant
    Dim item As Variant
    Dim tStart As Double

    tStart = Timer

    arr = Range("A1:A100000").Value
    For Each item In arr
        item = item * 100
    Next item
    Range("A1:A100000").Value = arr

    Debug.Print (Timer - tStart) & " seconds"

End Sub


