VBA With / End With Statement
Written by
Reviewed by
This article will demonstrate how to use With and End With in VBA
Excel provides us with the opportunity to learn VBA by recording macros. These macros record literally everything that we do on the screen and convert the actions into VBA code. We can then analyze this code and learn from it.
When we record a macro in VBA, most significantly when we are changing the format of cells, the macro will more often than not use the With… End With Syntax in it’s recording. Understanding what these mean and are used for is an important part of VBA.
Recording a Macro
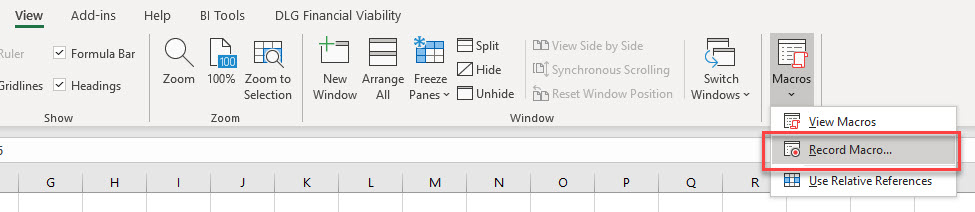
To record a macro in Excel, in the Ribbon, select View > Macro > Record Macro.
OR
Developer > Record Macro

Note: If you don’t see the Developer Ribbon, you’ll need to enable it. Click HERE to learn how to do this.
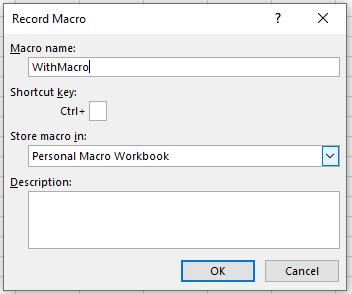
Type in the name for the macro, and click OK.
Highlight some cells, and then format them for Bold, change the color to red and amend the font size. Then click Stop in the bottom left hand corner of the screen to stop recording macro.
WITH Statement Syntax
To view / edit your recorded Macro: In the Ribbon, select View > Macros > View Macros. Select the macro just recorded, and then click Edit.
OR
In the Ribbon, select Developer > Visual Basic to switch to the VBE Window.
The recorded macro may look something like the example below
Sub WithMacro()
  Range("A2:C10").Select
  Selection.Font.Bold = True
  Selection.Font.Size = 12
  With Selection.Font
    .Color = -16776961
    .TintAndShade = 0
  End With
End Sub
Firstly, we have selected the range A2:C10.
We have then set the bold to true and the font size to 12. Note that the code “Selection.Font” is repeated for these lines.
The macro has then recorded us changing the color of the text – note that this time, the Selection.Font has a WITH in front of it, and the 2 properties that are being amended (the color and the tintandshade) have a period (.) in front of them. The area of code is then completed with an END WITH.
To simplify this code, we can move the Bold and the Size to be within the WITH statement, and therefore remove the need to repeat the the word Selection.
Sub WithMacro()
  Range("A2:C10").Select
  With Selection.Font
   .Bold = True
   .Size = 12
   .Color = -16776961
   .TintAndShade = 0
  End With
End Sub
The Syntax of a WITH… END WITH statement is therefore very simply:
WITH Object
'properties to format/change
END WITH
We could have amended the code in a different way:
Sub RemoveWith()
 Range("A2:C10").Select
 Selection.Font.Bold = True
 Selection.Font.Size = 12
 Selection.Font.Color = -16776961
 Selection.Font.TintAndShade = 0
End Sub
In the above example, we have added in the words Selection.Font to each line of the code. We have therefore referred repetitively to the Selection.Font Object in the code.
However, using the WITH statement means that we need only refer to this Object once in the code. It is a cleaner way of coding – it tells VBA to begin at WITH and the end at END WITH – the code to run is all enclosed within those 2 words. It makes the macro run faster and more efficiently (especially for longer macros), and adds structure to your code.
VBA Coding Made Easy
Stop searching for VBA code online. Learn more about AutoMacro - A VBA Code Builder that allows beginners to code procedures from scratch with minimal coding knowledge and with many time-saving features for all users!
Learn More!

