How to Record a Macro
Written by
Reviewed by
Recording a macro in Excel allows you to bundle several actions into a single action, which is handy if you find yourself performing certain action sequences often. With a macro you can automate common minor tasks, or entire workflows.
While recording a macro is easy to do, some extra knowledge about how recording works and some “best practices” can help you quickly master macros and increase your productivity.
Record a Macro
To begin recording a macro, click the “Record Macro” button on the bottom-left of the Excel window. This will show the “Record Macro” dialog box .

In the “Record Macro” dialog, enter the following:
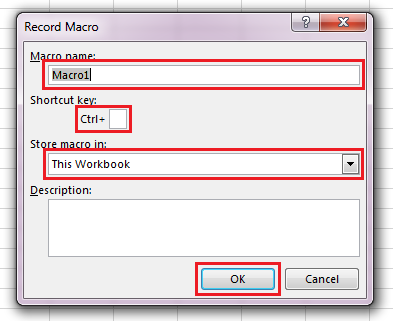
- Macro name: type a unique name for your macro (so you can identify it later)
- Shortcut key (optional): allows you to set a keyboard shortcut to run the macro later. Type a single character to assign this keyboard shortcut (for best results, use SHIFT when you type the character to avoid conflicts with other Excel shortcuts)
- Store macro in: This sets what workbook the macro will be stored in, which affects how you can use it
- “This Workbook” (most common option) means the macro will only be usable in the currently active workbook
- “Personal Macro Workbook” make the macro usable at any time in any workbook, by storing it in a hidden workbook that Excel always has open
- “New Workbook” (least common) stores the macros in a brand new workbook; useful if you’re making macros that you can’t save to “This Workbook” for some reason (i.e. “This Workbook” is a shared .xlsx file, you can’t save it as .xlsm, and the Personal Macro Workbook isn’t a good fit for the macro)
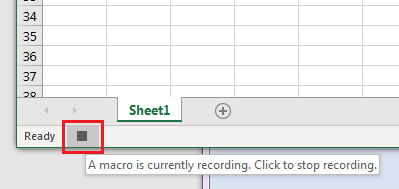
Click “OK” to start recording, then perform the actions you want to record. When you’re finished, click the “Record Macro” button again to stop recording (the button’s icon will have changed to a square “Stop” indicator)
Edit a Macro
After you’ve recorded a macro, you may want to view the code to edit it. You can access the code from the “Macros” dialog by following these steps:
- Select the View tab and click the “Macros” button (or click the dropdown and select “View Macros”)
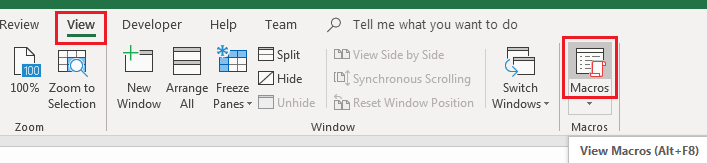
- In the Macros dialog, select the macro you want to view and click “Edit”
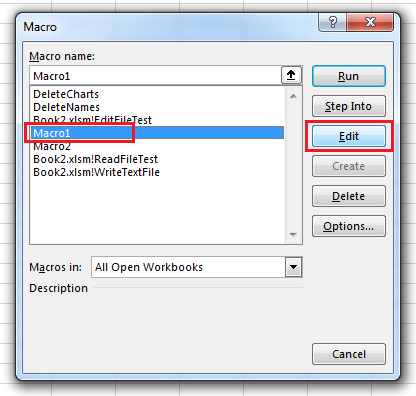
This will bring up the VBA Editor, with the cursor on the first line of your macro. From here, you can edit the code for clarity, add logic, or remove unnecessary code.
For more information on editing macros, see the article View and Edit Macros.
Run a Macro
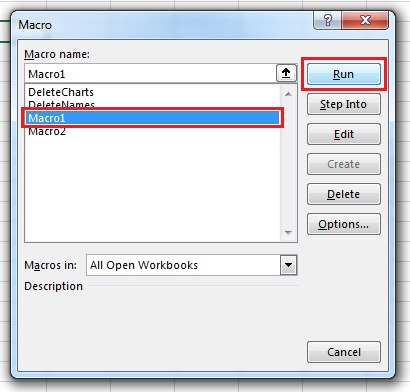
You will, of course, want to run your macro at some point. The general way to run a macro is to use the “Macros” dialog:
- Open the Macros dialog as per Editing a Macro (see above)
- In the Macros dialog, select the macro and click “Run”
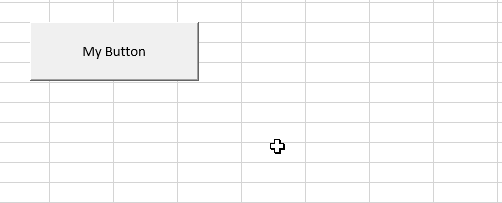
A better way to run a macro is to assign it to a button control.
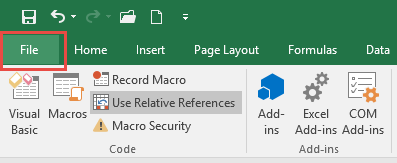
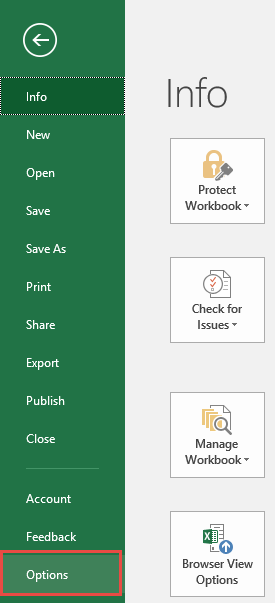
To do this, you’ll first have to add the Developer tab to the ribbon. Start by clicking File > Options in the list on the left-hand border
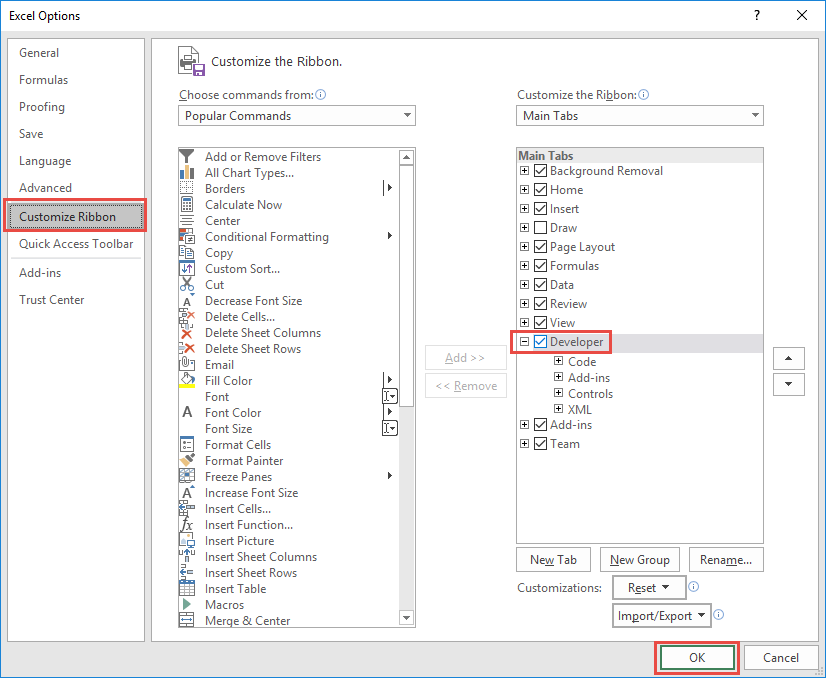
In the Options dialog select Customize Ribbon > Customize the Ribbon > Main Tabs and add a check-mark in the box for “Developer” and click OK.
With the Developer tab enabled, you can add a button to your worksheet like this:
- Select the Developer tab
- Click on the “Insert” dropdown and select the Button control under Form Controls
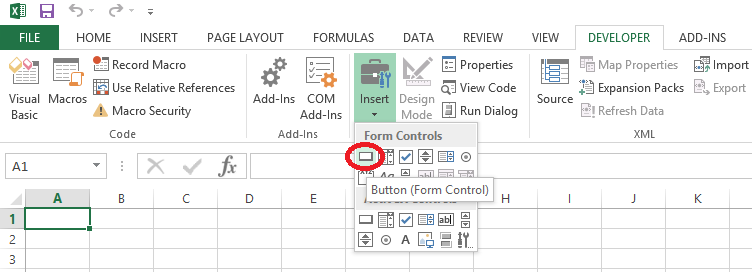
- Next, move the mouse anywhere over the worksheet surface, then hold left-click and drag the mouse to draw the outline of a rectangle. When you release left-click, a new dialog will appear titled “Assign Macro”. Select your macro and click “OK”.

Now you’ll have single-click way to run your macro, directly from the worksheet!
For more information on Excel Buttons, see the article “Add a Button and Assign a Macro in Excel”.
Macro Recording Tips
As you can see, it’s easy to get started recording macros – you can probably make some effective macros right away without reading ahead. To master macros though, you’ll want to know how the recorder works, and use that knowledge to plan your actions.
What Gets Recorded
Excel can record quite a lot of actions – more than you might think, and often more than you intend if you’re not careful! The Macro Recorder works by recording what your mouse clicks and keypresses do – making mistakes while recording can introduce some strange behaviors in your macro.
The following list includes a lot of actions you might not expect to get recorded, but it’s important to understand just how much Excel records so you can plan your macros better:
- Selecting cells using the mouse or keyboard (note: only the last selection before another action gets recorded; i.e. if you select cells A1:C4 and then select cell D1, only the selection of D1 gets recorded)
- Changing the text, formula, or formatting of cells (for text and formulas, changes are only recorded after you press Enter)
- Scrolling in a worksheet (each row/column you scroll gets recorded!)
- Moving the Excel window from one position to another
- Activating other workbooks or worksheets (either by clicking on them with the mouse, or using keyboard shortcuts like CTRL+PageUp)
- Adding, deleting, and moving sheets
- Saving a workbook, opening or creating new workbooks
- Running other macros
All these actions can introduce unintended consequences to your macros. For example: when recording a macro to be use in other workbooks, if you accidentally activate a sheet that won’t exist in those other workbooks, the macro may fail when you try to run it again!
What Doesn’t Get Recorded
Despite all the things you can (accidentally) record, there are some things that aren’t recorded:
- Moving the mouse around
- Changing the ribbon (i.e. customizing the ribbon, or clicking other tabs)
- Anything involving the VBA Editor
- Anything you do in Windows or other non-Excel programs (example: while you can record copy/pasting from one Excel workbook to another, you can’t record copy/pasting from Microsoft Word or Notepad into Excel)
- Logic – you can’t make Excel record your decisions (example: if you’re selecting columns in a table whose headers start with “Payment_”, Excel will only record the addresses of the columns you copy – it won’t understand you’re deciding which columns to select based on the header)
- Actions performed inside Dialogs like the “Advanced Filter” or “Conditional Formatting” dialogs (only the result of pressing OK in a dialog gets recorded)
While these things can’t be *recorded*, they can (mostly) be coded directly into VBA if you have the programming knowledge. Logic especially is something to take advantage of – the example given COULD be manually coded into a macro.
Use End-ArrowKey Combinations to Select Tables
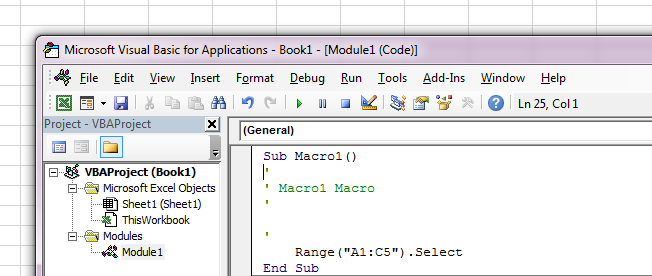
When you record a macro, instead of just using the mouse or arrow keys to select tables, you should try to use END-ArrowKey combinations. This is because Excel records cell selections differently for END-ArrowKey combinations. Consider the following table:

Using the mouse or arrow keys to select this table would produce the following code:
Range("A1:C5").SelectRe-running this macro would select the exact same range, every time. If data is added to the table, it won’t be selected by the macro.
Instead, the table could be selected with two key combinations: Shift-End-KeyRight, followed by Shift-End-KeyDown. That would produce this code instead:
Range(Selection, Selection.End(xlToRight)).Select
Range(Selection, Selection.End(xlDown)).Select
Note that there are no exact ranges given – instead, the key combinations used are recorded. Now the macro doesn’t have to be re-coded if the table expands.
Take Advantage of Relative References
As mentioned earlier, Excel records the exact cells you select when you use the mouse or arrow keys. If you record yourself creating a table on a worksheet, that macro will create the table in the same spot, every time. This is called Absolute Referencing.
This behavior can be changed, however, to instead record the cells you work with relative to the initially selected cell. That way, your macro could create the table wherever you put the cursor.
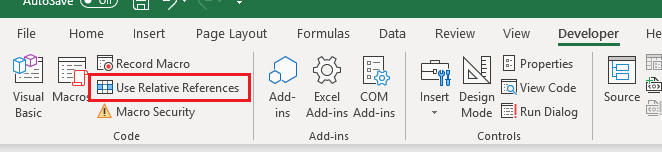
To turn Relative References on, select the Developer tab, then click “Use Relative References” (this is a toggle; click again to return to absolute referencing). Remember to select the initial cell before you start recording!
Relative References aren’t recorded universally – some functions like the Advanced Filter or “Format As Table” require the user to enter an absolute range. If you use Relative References, you may need to edit the macro’s VBA code later depending what functions you recorded.
Keep it Simple
While it’s tempting to record lots and lots of tasks into a single macro, it’s better to keep your macros small and focused on automating specific tasks.
For one, it’s actually really hard to record a long macro without making any mistakes. Even with a well-defined plan of mouse clicks and keypresses, mistakes happen and can get frustrating really quickly.
For two, large macros are difficult to debug when something goes wrong. It can take a long time to search through VBA code to find out what’s causing the problem, and even when the issue is found it can be difficult to fix without breaking something else.
Because of those concerns, it’s often better to split a long macro into smaller parts that focus on specific things. As an example, a macro that creates a report might be split into two parts: one macro to import and consolidate some data, and another macro to add formatting to the report. These smaller macros will be easier to record, easier to test, and easier to debug if something goes wrong.
